I just finished Crowley's bustle and petticoat, so I thought I'd post some details about what I've learned from this whole pile of crazy. I am no expert, but these are some things I googled and failed to find results for, so I'm putting out what worked best for me.
Chemise: Make it out of thin, soft, breathable fabric.
Drawers: Drawers do not look good. Period. They're weird. Now, if you make them out of thin fabric, and trim them well, it distracts from the camel-toe front and sagging ass back, but they still aren't sexy.
Corsets: Make them longer than you think you'll need. Once you do a fitting you can trim them down a bit, but it's always better to go longer. For a single layer corset use bias strips for your channels. If you are covering your coutil in something pretty, stitch your boning channels to the inside. If you need exterior boning channels, stitch your pretty fabric and your coutil into a tube, press flat with the seam centered, and then trim the seam allowance.
If you try to do bias of pretty and bias of coutil layered on top of one another, there will be shifting and fraying and uneven-ness. If you stitch the pretty and the coutil together into a tube, trim the seam allowance, and then press, there will be fraying. Better to make a tube, press first, and then trim.
When possible, do a final fitting before all the seams are finished, in case there needs to be any minor tweaking. And always stitch pieces together, then press to one side and stitch down 1/16th inch away from the seam, then finish as you please (flat-fell into a boning channel or trim and cover with bias channel). Stitching each seam twice will let you sleep easy knowing that spontaneous corset explosion is not on the docket.
Bustles: Online tips suggest light fabric, but get the light side of well woven fabric, like twill, or heavy quilter's cotton. Making bustles out of muslin just starts a mental countdown of how long you have until it tears and you have to make another bustle.
If you are making a bustle out of an online guide (like this one) and have never made one before, two-thirds of you corseted high hip measurement makes a nice sized bustle. (So if, with your corset on, your high hip is 30 inches, the top bone of your bustle should be around 20 inches, at least if you want a bustle that looks like those I've made.) You can obviously go larger (Crowley's is the only bustle that is larger that that proportion), but if you were wondering where's a good place to start, that's where I started.
In the American Duchess guide I linked, she put the apex of her top bone 4 inches from the waistband edge. Do not put it closer to the edge than that, or the angle gets pretty extreme. If you are a larger woman, you might want the apex 5 or 6 inches from the waistband, so there is room for your butt and the bustle won't try to ride up.
Petticoats: If you are short (i.e. less than 5 feet tall), and don't mind a petticoat that lacks fluff, you can kinda get away with 3 yards of 44 inch wide material. Otherwise, you want closer to 4 or 5, in order to make ruffle-y bits. All of my petticoats followed the same basic pattern. I cut the front and the side fronts as shown, but I cut the back and back sides only to knee length (usually about 25 inches for the side backs and 26 for the back). Side backs and back stitched together to about 50-55 inches at the bottom, so I made a ruffle out of a 100-120 inch long strip, and wide enough to reach the skirt's finished length, and stitched it to the back. Then the petticoat back can be stitched to the front half, along with a placket for closures and a waistband.
For Samifer's, the whole thing was made about 6 inches shorter, and a pre-gathered eyelet band was added to the bottom. Most have cording thrown in the back, to keep it fluffy, and Dean's has two rows of ruffles. Crowley's was made 4 inches shorter, because she's just that short, and lace was added to make up for the lack of ruffle (her ruffle was only 65 inches, stitched onto the 50 inch back, because I ran out of fabric).
That skirt pattern makes for a super fluffy petticoat for a woman with a 26 inch corseted waist. It makes a decently fluffy petticoat for a woman with a 30 inch corseted waist. Larger than that, and I suggest adding width to each piece to keep the fluff. For Castiel, I subtracted 26 inches from her corseted waist measurement, then divided the difference by the number of skirt pieces, and added that much on to each. Or you could just add where you like. (To a super fluffy petticoat for a 30 inch corseted waist, you'd want to add a total of 4 inches to the pattern, which you could just add an inch to the side back and half back pieces, making 4 inches overall. That way the extra width is concentrated in the back where you want it.)
Pictures of Crowley's bustle and petticoat will follow soon, but for now I'll let you digest that brick of text.
Showing posts with label Step 3: corsets. Show all posts
Showing posts with label Step 3: corsets. Show all posts
Wednesday, August 20, 2014

Tuesday, August 12, 2014
Pictures!
So I realized that I never posted the pictures of Gabriel in her corset, so here you go:

 As you can see, Gabriel has no ribcage, thus she hourglasses really well. It has also been decided that she has five gallons of tits.
Crowley's corset is done minus the flossing. She had to leave before I was done binding, so I laced her into it unfinished so I could take her measurements before she left.
 You can see the part of the top binding hanging loose, but it was sound enough to try on. Ignore the lint on her chemise.
I finished the binding after she left, and added trim.
 Need to buy lacing and floss, but it's basically done.
 Close-up of trim, and a better image of the color. The corset is a olive green silk, stitched with gold silk thread, and bound in a chocolate brown silk. The trim is some polyester stuff that I had kicking around, and it matched nicely.
I realized that I didn't buy nearly enough fabric for Castiel's outfit, so I was barely able to cut out all the skirt panels. I'll be able to make the placket, and maybe the waistband, but there isn't enough left for the hem facing and the bodice, so I'll be buying more come payday.
Plans for this month include finishing all of Crowley's undergarments, and all of the skirts. Maybe a bodice or two as well. We'll see where I get.
Crowley's corset is done minus the flossing. She had to leave before I was done binding, so I laced her into it unfinished so I could take her measurements before she left.
 |
| So scandalous |
I realized that I didn't buy nearly enough fabric for Castiel's outfit, so I was barely able to cut out all the skirt panels. I'll be able to make the placket, and maybe the waistband, but there isn't enough left for the hem facing and the bodice, so I'll be buying more come payday.
Plans for this month include finishing all of Crowley's undergarments, and all of the skirts. Maybe a bodice or two as well. We'll see where I get.
Thursday, July 3, 2014
Crossing things off the list
Having finally been able to meet up with Crowley and work on things for her, I can officially cross stuff off the to-do list.
 Firstly, Crowley's chemise. I was going to do more detailing on it, but lazy happened.
 Close up of the handmade lace.
 Secondly, Crowley's drawers. I still need to add buttons and buttonholes, but she needs to try them on so I can get the fit. Also, considering that it is physically impossible for me to pass up sale buttons, how do I not have any that are plain black? The best I have are domed black velvet buttons, but A) I may end up using those on Crowley's bodice, B) there aren't many so I can't waste them, and C) domed buttons under a corset sounds painful. So I need to buy MORE buttons. (I love buttons, but I can never spend less than $20, because I will buy buttons by the crapload.)
 Close up of the stacked ribbon trim. I was going to do 1/4 inch tucks around the legs and stitch the red ribbon to the underside so that an 1/8 inch of red ribbon would peek out from the tucks, but once again lazy happened.
I choose to do Crowley's undergarments in black since all he wears on the show is black, with a touch of red because he is the daring-est devil you've ever met. It's a perfect color scheme for the King of Hell.
The corset, chosen for the player not the character, is an olive green stitched in gold. The whole thing is finished except the seams, since I like to do a final fitting before everything is flat-felled and encased. Once I do the fitting, I can bind it, bone it, and floss it. Considering I want to have everything done in 4 months, I need to get busy.
Project Steps:
Chemises (Completed)
Drawers (Completed)
Corsets (4 of 5 Completed)
Bustles (2 of 5 Completed)
Petticoats (2 of 5 Completed)
Skirts (1 of 5 Started)
Bodices (Not Started)
Just keep sewing, just keep sewing . . .
I choose to do Crowley's undergarments in black since all he wears on the show is black, with a touch of red because he is the daring-est devil you've ever met. It's a perfect color scheme for the King of Hell.
The corset, chosen for the player not the character, is an olive green stitched in gold. The whole thing is finished except the seams, since I like to do a final fitting before everything is flat-felled and encased. Once I do the fitting, I can bind it, bone it, and floss it. Considering I want to have everything done in 4 months, I need to get busy.
Project Steps:
Chemises (Completed)
Drawers (Completed)
Corsets (4 of 5 Completed)
Bustles (2 of 5 Completed)
Petticoats (2 of 5 Completed)
Skirts (1 of 5 Started)
Bodices (Not Started)
Just keep sewing, just keep sewing . . .
Tuesday, July 1, 2014
Historical Sew Fortnightly #12
I am, once again, doing things. Yay for motivation. For this challenge I made . . . another corset.
Okay, there have been a lot of corset posts, but to be fair I need five total and they keep qualifying for different challenges, so go with it.
My fourth corset is for Gabriel, and ended up very nice.
 The corset is a peacock silk dipioni flat lined to coutil, stitched in brown silk. It has an olive silk binding and a ivy border.
 I had to hit a couple of fabric stores in order to find a binding I liked. None of the options I thought would work in the beginning actually looked good when the corset was finished. The leaf border was a speciality ribbon I found as a remnant. Since I didn't have any matching thread I had to very carefully remove the ivy from the brown ribbon it was attached to in order to save the thread it came with.
 For the laces I found this very nice brown cording that matching the stitching. The flossing is the same thread used in construction.
The breakdown:
The Challenge: #12 Shape and Support
Fabric: Peacock silk dupioni, olive silk dupioni, cotton coutil
Pattern: 1880s corded corset from Waugh's Corsets and Crinolines, drafted to measurements
Year: Mid-1880s
Notions: Brown silk thread, brown polyester cording, spring and spiral steel bones, spoon busk, grommets, and 2/3 of a yard brown ribbon with ivy border
How historically accurate is it? The pattern and construction are good, but the lacing is polyester and the glitter printed ivy trim is way off. Considering that these are pretty minor points, maybe 90%, though the color may have been too out there for the time period.
Hours to complete: I had to take a break in the middle, so no clue.
First worn: Unworn as of yet, but hopefully photos will happen soon.
Total cost: $60?
Okay, there have been a lot of corset posts, but to be fair I need five total and they keep qualifying for different challenges, so go with it.
My fourth corset is for Gabriel, and ended up very nice.
The breakdown:
The Challenge: #12 Shape and Support
Fabric: Peacock silk dupioni, olive silk dupioni, cotton coutil
Pattern: 1880s corded corset from Waugh's Corsets and Crinolines, drafted to measurements
Year: Mid-1880s
Notions: Brown silk thread, brown polyester cording, spring and spiral steel bones, spoon busk, grommets, and 2/3 of a yard brown ribbon with ivy border
How historically accurate is it? The pattern and construction are good, but the lacing is polyester and the glitter printed ivy trim is way off. Considering that these are pretty minor points, maybe 90%, though the color may have been too out there for the time period.
Hours to complete: I had to take a break in the middle, so no clue.
First worn: Unworn as of yet, but hopefully photos will happen soon.
Total cost: $60?
Saturday, May 24, 2014
Real fast
Not feeling too well, think I might be coming down with a sinus bug that's been going around. It's been affecting my progress, so I might not have much to show at the end of the month. So instead, here is Castiel in her corset:
 Also note: Eyebrow.
Thursday, May 22, 2014
Another One Bites The Dust
Third corset completed. Castiel's corset was finished only moments ago, and it feels good to be able to mark something off the list. Next up will be Crowley's chemise and drawers, and hopefully I'll be able to finish Gabriel's corset by the end of the month. Those three things: the chemise, drawers, and corset, are around 50% done at the moment. If I can get them done, then I can mark off the Chemise Step and the Drawers Step entirely, as well as only having one corset left to do. Get that done as far as the final fitting, and I'll be able to start on two more bustles and petticoats. Not to mention starting the actual outfits. We'll see how far I get by the 31st. But now pictures!
 Castiel's corset is a garnet silk, stitched in black silk thread, with black silk binding and champagne lace.
 Close-up on the cording. The silk is a bit darker that the photo shows, it's more of a burgundy than a red.
 Close-up of the flossing. Every other bone is flossed in a feather. For reasons.

The eyelet bones are flossed with a pair of wings. Please ignore wonky stitching on wrong side. Also, this is closer to the true color of the corset. The lacing is champagne to match the trim.
 Finally, a close-up of the lace. You can see some of the feather flossing peeking out.
The hardest part of this corset was that I stitched a couple of boning channels too narrow, and it was a bitch to get the the bones in later. One of the channels even had to be re-stitched. There are a couple of spots on Gabriel's corset that are going to give me the same problem, so I'm going to fix it before I install the spoon busk. No reason to give myself the same headache a second time.
Now I'm off, to go tie up Castiel and see if I can get some shots of her wearing the corset. And for those of you who have watched the season finale of Supernatural:

The eyelet bones are flossed with a pair of wings. Please ignore wonky stitching on wrong side. Also, this is closer to the true color of the corset. The lacing is champagne to match the trim.
The hardest part of this corset was that I stitched a couple of boning channels too narrow, and it was a bitch to get the the bones in later. One of the channels even had to be re-stitched. There are a couple of spots on Gabriel's corset that are going to give me the same problem, so I'm going to fix it before I install the spoon busk. No reason to give myself the same headache a second time.
Now I'm off, to go tie up Castiel and see if I can get some shots of her wearing the corset. And for those of you who have watched the season finale of Supernatural:
Tuesday, April 15, 2014
Wah-bam!
I am feeling good. Since I will be out of town next week, I wanted to get as much done on my Victorian Femme goals as possible, that way I can hand-sew my shift and stays for the Amazzone costume while I'm on vacation. (I don't want to lug my machine along with me, and I don't like my mother's machine.) Sunday was my day to work on Samifer's bustle, which was completed. Yesterday through Thursday I allotted for Gabriel's corset, and then Friday through Sunday will be Samifer's petticoat, giving me Monday to make a mock-up of the stays and gather the bits so it will be ready to be worked on. Yesterday was spent basting the silk to the coutil on each piece of of the corset. Getting them lined up can be tricky, so I hand sew it, thus it takes a while. Today I started on the actual stitching, and well, look!
 Cording done on all the front pieces, boning channels added to the sides and back, and those pieces stitched together. (While the picture is only of half, I have both sides done to equal completion.) All I need to do is make up some covered channels, add them to the second piece, and stitch it all together. The front channels can't be added until I have the busk, but I should be able to do a final fitting this Saturday. Minus the basting, this thing took a day. A DAY. Mine took over a week. I really feel like I'm hitting my groove. (Beware the groove!)
And one more picture, lest you think Gabriel's corset is a little too similar to Samifer's.
 The color is called 'peacock' and it's a lovely bluish-green. It's stitched with brown silk thread, and following the 'accidentally another fandom' theme (see Samifer's TARDIS corset), it's looking very Daenerys Targaryen.
So I've decided to do dragonscale flossing on it when it's finished. Gabriel fully supports this. Right now I going to take a break for ice cream and beer, and then try to finish this corset.
Update: Aw yeah.

And one more picture, lest you think Gabriel's corset is a little too similar to Samifer's.
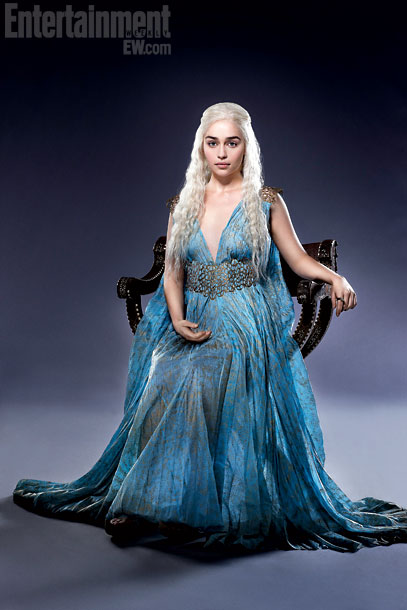 |
| A la this outfit |
Update: Aw yeah.
Wednesday, April 9, 2014
Because life should be it's own obstacle course
Apparently I've decided that life is too easy, and so I have to make challenges to increase the difficulty. I have decided to make the Amazzone Perugina costume, and hopefully in time for the Art challenge due on June 1 for Sew Historical Fortnightly. BUT I can only start work on it after I've finished my goals for the month. Castiel's corset is as complete as possible without a busk (I basted the front pieces together to do a final fitting before flat felling all of the seams into boning channels). I still have to add two boning channels to each front piece, but I need the busk to figure out placement. Then I can bone it, bind it, and floss it. I've started the mock-up for Gabriel's corset, and hopefully I'll be able to measure Samifer for her bustle and petticoat tomorrow.
Holding my new project hostage until I complete my goals has given me new motivation. BUT I've also decided I'm not going to buy any fabric for Amazzone. I can buy things from Goodwill, to cannibalize for parts, but otherwise I'm making it from stash. Shift, stays, petticoats, pockets, all of it. Because apparently 'crazy' is my lifestyle choice. I have some remnants I like for the interior and exterior of the stays, and some clearance brown jean for the core of it. Muslin for the shift, an old cotton print for the pockets, a Goodwill silk blouse for the habit shirt. But I only have from when I finish my Victorian Femme goals until the end of April to work on it. After that, I get new goals for my main project and Amazzone goes on the back burner again.
And I still want to get it done in little over a month. No biggie. *silently screaming*
Holding my new project hostage until I complete my goals has given me new motivation. BUT I've also decided I'm not going to buy any fabric for Amazzone. I can buy things from Goodwill, to cannibalize for parts, but otherwise I'm making it from stash. Shift, stays, petticoats, pockets, all of it. Because apparently 'crazy' is my lifestyle choice. I have some remnants I like for the interior and exterior of the stays, and some clearance brown jean for the core of it. Muslin for the shift, an old cotton print for the pockets, a Goodwill silk blouse for the habit shirt. But I only have from when I finish my Victorian Femme goals until the end of April to work on it. After that, I get new goals for my main project and Amazzone goes on the back burner again.
And I still want to get it done in little over a month. No biggie. *silently screaming*
Sunday, April 6, 2014
Corset Number 3. Three corsets, ah ah ah!
Castiel's corset is coming along nicely, especially since I'm trying to be efficient about my work. I sewed all the cording channels in one go, then sat down and threaded all of the cording through. Then I cut all the strips of coutil for the boning channels, and ran them through the bias tape maker (while ironing, of course). Normally, I just work on one thing till I get bored, then I'll change to something else until I can't do anymore or I again get bored, and then do something else. Which is terribly inefficient. So I fought through my boredom and just kept doing a thing until said thing was done. All of the cording is finished, the third, fourth, and fifth pieces have all of their boning channels and are sewn together.
 It's my best corset so far. My phone is bad at picking up colors, but the fabric is a burgundy silk duponi, stitched with black silk thread. All of the channels are stitched to the inside of the corset, so all you see on the outside is the outline. Since I'm getting better at stitching straight and taking my time, I may attempt flat felled channels at the seams, but I've got extra fabric if it looks bad and I decide to do covered channels instead.
Of course, no amount of efficiency can make up for a sudden change of plan, so although I have strips of coutil ready to be covered in silk and stitched in place over the front two pieces, I've decided to do it a different way. Every attempt I've made at covering a strip of coutil with an equal sized strip of silk and then stitching them together onto a corset hasn't looked very nice. It's functional, but the silk frays and sticks out and it's hard to keep the pieces aligned. Then I remembered a different way to make channels: sew a tube, press it flat with the seam in the middle (not at the edge), and sew it down onto the corset. Since I want the channels to be silk covered coutil, I think it would be easier to stitch a tube of the layered fabrics, press, and then sew. At least that way the fabrics can't shift independently of each other and look messy. It's worth a shot, and if it works out as planned, this corset may be the first of what I'd consider a sell-able quality.
Of course, no amount of efficiency can make up for a sudden change of plan, so although I have strips of coutil ready to be covered in silk and stitched in place over the front two pieces, I've decided to do it a different way. Every attempt I've made at covering a strip of coutil with an equal sized strip of silk and then stitching them together onto a corset hasn't looked very nice. It's functional, but the silk frays and sticks out and it's hard to keep the pieces aligned. Then I remembered a different way to make channels: sew a tube, press it flat with the seam in the middle (not at the edge), and sew it down onto the corset. Since I want the channels to be silk covered coutil, I think it would be easier to stitch a tube of the layered fabrics, press, and then sew. At least that way the fabrics can't shift independently of each other and look messy. It's worth a shot, and if it works out as planned, this corset may be the first of what I'd consider a sell-able quality.
Wednesday, March 26, 2014
Everyday I'm Bustlin'
My bustle is basically done. I still have to stitch the buttonholes, but otherwise it's all good. The pattern was drafted using American Duchess' Lobster Tail Bustle tutorial. The fabric is muslin, the bones are buckram-covered hoop wire, the ties are grosgrain ribbon, and I used some pre-packaged grey bias tape and some grey buttons I got in a sewing kit years ago.
 This is before the top of the waistband was bias bound and the buttons were added.
 Back view.
 Collapsed on the table. The wires stack on top of each other and it folds down pretty flat.
I'm happy with the size of it. Once I make a petticoat my foundation garments will be done. I also did a mock-up fitting of Castiel's corset. It needs enough modification that I'll be doing a second mock-up, but all in all it was pretty good. Just need to adjust some curves, but adjusting curves is what a corset is all about.
I'm happy with the size of it. Once I make a petticoat my foundation garments will be done. I also did a mock-up fitting of Castiel's corset. It needs enough modification that I'll be doing a second mock-up, but all in all it was pretty good. Just need to adjust some curves, but adjusting curves is what a corset is all about.
Tuesday, March 25, 2014
A Wild Corset Appears
Sorry for the disappearance, I've been busy of late. (Busy watching Haven on Netflix, but who's counting.) I wasn't able to do the latest HSF challenge, because I already was busy with the second corset, which is now finished.
 The corset before binding. The blue fabric is a silk dress I purchased for $3 at Goodwill. My phone isn't good with details, but it has a floral and paisley design to it. There wasn't enough to do boning channels as well (it was only a size 4, and knee length, but it had a wrap-front skirt which yielded almost half of the corset pieces on its own), so after conferring with Samifer, black silk was chosen. It is stitched with white silk thread.
 Samifer in her finished corset, also wearing her chemise and drawers . . . which I'm now realizing she had her chemise inside out since that's not what the embroidery is supposed to look like. Anywho, she likes it. It's a good fit, though the bust could have been tighter, and she hourglasses well. I may need to pick up more lacing, as it's more difficult than it should be to get the busk closed, but otherwise I'm happy. (The fact that Samifer's corset is in TARDIS colors is completely coincidental. Also, awesome.)
Next up on the list is Castiel, but since I'm going to have to order more busks (when I went to Richard the Thread they only two busks in the size I need), I may start intermittently working on my bustle.
I'm going to try for the next HSF challenge, but I honestly cannot think of a favorite fairy tale, so I may skip it due to creativity block.
Next up on the list is Castiel, but since I'm going to have to order more busks (when I went to Richard the Thread they only two busks in the size I need), I may start intermittently working on my bustle.
I'm going to try for the next HSF challenge, but I honestly cannot think of a favorite fairy tale, so I may skip it due to creativity block.
Monday, March 3, 2014
Corset Update
In knitting, particularly colorwork, there's a trick if you screw up and use the wrong colors in the pattern. You simply make the same mistake for the rest of the project, and then it's no longer wrong but an 'interpretation of the pattern.' In sewing, some trim or decorative embroidery turns a flaw into a 'design feature.' I didn't like the space between my busk and the first bone. (About 1/8th of an inch.) I seemed a tip off that it was my first corset. But now?
 Herringbone stitch down the length of the corset and it's a pretty design element.
Even though I said this corset was more me than my character, I couldn't help doing a little Supernatural-theme flossing.
 D.W. on the inside lacing bones (My character is Dean Winchester.) The Aquarian Star, symbol of the Men of Letters, and a pentagram.
 The little triangles on all of the other bones were inspired by the center of this sigil:

used to open Purgatory.
And for those of you reading this who don't watch the show and are wondering about the strange symbols and giving me suspicious glances,
 I don't have a good answer.
Even though I said this corset was more me than my character, I couldn't help doing a little Supernatural-theme flossing.
used to open Purgatory.
And for those of you reading this who don't watch the show and are wondering about the strange symbols and giving me suspicious glances,
Saturday, March 1, 2014
Sew Historical Fortnightly #4
For this fortnightly challenge, I made a corset. Like a real, actual, using a Victorian pattern and corset fabric and metal bones corset.
Dude, you guys, I made a corset.
Technically, it is not yet finished as I still need to floss it, but my back has been hurting me for weeks so I was in a hurry to finish it on the thought that maybe the extra back support would help. It does, a little. The compression and trapped body heat stopped the muscle spasms, but I think it's more a situation of it giving me new sensations to concentrate on rather than an actual lessening of pain.
The pattern that I used was this one, from Waugh's "Corsets and Crinolines":

I resized it to fit my measurements, made a mock-up of duck canvas, made alterations, and then made my final corset. It is in no way perfect, my stitches are wonky and there's little frayed bits where the pretty fabric frayed too much (the coutil was all sewn through, though, so there's no structural instability.) However, what my corset lacks in a clean finish it more than makes up for by being so very pretty.

The corset is a lovely silver/grey stitched with teal thread and bound in teal ribbon and white lace.

I bought some matching teal cord to use as lacing, but I was apparently unable to brain this morning as I bought a laughably insufficient length. Right now I have it laced with this black shoelace-style cord that came with a store bought corset.

It gives a nice nipped waist without being too restrictive. It also has great bust support, though if I were to make it again I would make the sides of the breast section higher, so I don't have so much side spill.

Close-up. You can see the grey has different shades depending on the lighting.
 And the back. You can see I still have a gap, so I could lace it tighter if I so wished. Also, the things in my hair are beads.
 Lastly, a close-up of the bust. The diagonal lines at the bottom of the picture are the stitching lines of the cording. Hey bro, I heard you like lace, so I got you some lace to go with your lace.
These colors aren't really Dean, but I figured that since I'll no doubt be using this corset for other costuming adventures I should make in 'me' colors, not character colors.
As this was my first true corsetry adventure, things I thought would be hard (exterior boning channels, installing the spoon busk, sewing the binding once the boning was in) really wasn't. It took me a while to figure out exactly how to put the damn thing together since I wanted a single layer instead of an easier to sew sandwich. I went slow (hand turning the drive wheel on my machine to make each stitch as I did the binding instead of using the petal so I wouldn't hit a steel and damage Edith (Yes, I named my sewing machine. Edith is a classy lady and deserved a proper name.)), took the easier path when able (such as removing a few bones that weren't necessary to the fit), and generally enjoyed the experience. The worst part is that SoCal is currently experiencing weather, which messed with my Wifi and made it hard to re-watch Ripper Street while hand-stitching the inside of the binding. I learned a lot, and I think each consecutive corset I make will be that much better. Until then, the breakdown:
The Challenge: #4, Under it All
Fabric: Undyed coutil, flatlined with silk dupioni and treated as a single layer.
Pattern: Norah Waugh's Corsets and Crinolines
Year:1880s
Notions: Spiral and spring steel, spoon busk, grommets, silk thread for sewing, and cotton yarn for cording.
How historically accurate is it? Pretty dang. The pattern is accurate, and while I haven't seen this color combination in a corset before, the 1880s did have some pretty wild color schemes. The spoon busk is right for the time period, as are the fabrics and thread. Same with metal grommets and steel boning, though I personally don't know whether spring steels were in use then. The major issues are that the ribbon for binding is polyester, and the lace is rayon.
Hours to complete: About 18-20, broken up over three days.
First worn: Right now.
Total cost: $80-100. I didn't own any of the bits for making corsets, but since I'm going to be making so many I bought what I could in gross so it was cheaper per corset than if I had just bought enough supplies for one.
Dude, you guys, I made a corset.
Technically, it is not yet finished as I still need to floss it, but my back has been hurting me for weeks so I was in a hurry to finish it on the thought that maybe the extra back support would help. It does, a little. The compression and trapped body heat stopped the muscle spasms, but I think it's more a situation of it giving me new sensations to concentrate on rather than an actual lessening of pain.
The pattern that I used was this one, from Waugh's "Corsets and Crinolines":
I resized it to fit my measurements, made a mock-up of duck canvas, made alterations, and then made my final corset. It is in no way perfect, my stitches are wonky and there's little frayed bits where the pretty fabric frayed too much (the coutil was all sewn through, though, so there's no structural instability.) However, what my corset lacks in a clean finish it more than makes up for by being so very pretty.
The corset is a lovely silver/grey stitched with teal thread and bound in teal ribbon and white lace.
I bought some matching teal cord to use as lacing, but I was apparently unable to brain this morning as I bought a laughably insufficient length. Right now I have it laced with this black shoelace-style cord that came with a store bought corset.
It gives a nice nipped waist without being too restrictive. It also has great bust support, though if I were to make it again I would make the sides of the breast section higher, so I don't have so much side spill.
Close-up. You can see the grey has different shades depending on the lighting.
These colors aren't really Dean, but I figured that since I'll no doubt be using this corset for other costuming adventures I should make in 'me' colors, not character colors.
As this was my first true corsetry adventure, things I thought would be hard (exterior boning channels, installing the spoon busk, sewing the binding once the boning was in) really wasn't. It took me a while to figure out exactly how to put the damn thing together since I wanted a single layer instead of an easier to sew sandwich. I went slow (hand turning the drive wheel on my machine to make each stitch as I did the binding instead of using the petal so I wouldn't hit a steel and damage Edith (Yes, I named my sewing machine. Edith is a classy lady and deserved a proper name.)), took the easier path when able (such as removing a few bones that weren't necessary to the fit), and generally enjoyed the experience. The worst part is that SoCal is currently experiencing weather, which messed with my Wifi and made it hard to re-watch Ripper Street while hand-stitching the inside of the binding. I learned a lot, and I think each consecutive corset I make will be that much better. Until then, the breakdown:
The Challenge: #4, Under it All
Fabric: Undyed coutil, flatlined with silk dupioni and treated as a single layer.
Pattern: Norah Waugh's Corsets and Crinolines
Year:1880s
Notions: Spiral and spring steel, spoon busk, grommets, silk thread for sewing, and cotton yarn for cording.
How historically accurate is it? Pretty dang. The pattern is accurate, and while I haven't seen this color combination in a corset before, the 1880s did have some pretty wild color schemes. The spoon busk is right for the time period, as are the fabrics and thread. Same with metal grommets and steel boning, though I personally don't know whether spring steels were in use then. The major issues are that the ribbon for binding is polyester, and the lace is rayon.
Hours to complete: About 18-20, broken up over three days.
First worn: Right now.
Total cost: $80-100. I didn't own any of the bits for making corsets, but since I'm going to be making so many I bought what I could in gross so it was cheaper per corset than if I had just bought enough supplies for one.
Sunday, February 9, 2014
Still at it
I have the mock-up for my corset all done and good, so I moved on the Samifer's corset. I'll be doing the fitting tomorrow, but I already took what I learned from mine and applied it, such as making the bust an inch higher to begin with. If that's too much, I can mark the fabric and and transfer it to the pattern, but I'd rather start with too much and trim it down than to start with it too short and have to worry about making another. I realized I can only fit one mock-up at a time, since I only have one set of lacing strips. It's helped me pace myself. I've been working on lace for Crowley's chemise, as well as socks for Crowley. In Weldon's Practical Knitter Vol. 10 there's a pattern for Scotch plaid socks. They're two color, Fair Isle socks in a lovely pattern that's a hell of a lot easier than argyle. I also bought yarn for my socks (black wool), Samifer's (white wool), and Castiel's (black cotton). They have some nylon content so they won't be period correct, but I hate droopy socks. I still have to decide on sock color for Gabriel. I think he would have crazy socks, but I haven't decided. This project is making me ask the hard questions: "What color underwear would Lucifer wear?" "What kind of socks would Gabriel have?" "How do I take the excessive number of layers most actors wear on the show and fit it into the Victorian aesthetic of two, maybe three colors, and a bodice that matches the skirt?"
First World Problems
First World Problems
Thursday, February 6, 2014
Mock-up Part 2
So since my first mock up fit pretty well, I figured that was good enough and was going to just let it go. But then it occurred to me: the final corset will have cording, and I've never done cording. And since the cording will be near the bust, what if it shortened the bust so that the extra length I added disappears in the cording? So I decided a second mock-up was in order. I want my finished corset to be a single layer of coutil topped with a layer of silk duponi, with external bone casings. The cording I can sew between the silk and the coutil, but for the mock-up I used a scrap piece of duck. At first the cording didn't look like anything that would give support, but when I finished, Wow. Here's a look at the corded mock-up:

To compare, this is the same seam on the non-corded version:

See how the corded version stands at attention, while the basic version just wrinkles down on itself? Color me impressed. The fit overall was better this time:
 It no longer poked when I sat down, and my boobs were more secured. The cording will need to be raised up, closer to my actual bust, and angled better, but I marked those points on my corset. I also am going to change the curve slightly in front, because having it hug closer to my underbust gives me better cleavage. All in all, things are starting to take shape. (Did you see what I did there?)
Update: I ripped out the bust seams and sewed them with less of a curve. Much better.
To compare, this is the same seam on the non-corded version:
See how the corded version stands at attention, while the basic version just wrinkles down on itself? Color me impressed. The fit overall was better this time:
Update: I ripped out the bust seams and sewed them with less of a curve. Much better.
Wednesday, February 5, 2014
O Frabjous Day
Since I live about an hour from Los Angeles, I figured I'd be able to buy all my corset supplies locally. But since Farthingales L.A. closed down, I started looking for other places. I'd found a link for Richard the Thread, which is in L.A., but comparing the price of boning to another internet store, it was much more expensive. Plus, their spoon busks only come in 11" and 12" sizes, and I was going to need closer to a 14" for four of the corsets. So they dropped off my radar. Today I got the idea to check just coutil, since it would probably be the most expensive part to ship, and if I could find it in L.A. it would save me quite a bit of monies. (Random note: spell check red lines "coutil," but not "monies" so I did a search. Monies is an actual word and is the plural of money. I thought it was just an internet thing.) Richard the Thread came up in my search, so I checked their price. It's almost half the cost of the place I was thinking about getting it! Even with the online minimum of 5 yards, it would still cost me less than 4 yards from another store. So I started looking at other things, and found that everything except the boning and the longer busks are cheaper at RtT.
So now to plan a trip to L.A.
So now to plan a trip to L.A.
Mock-up
Made my corset mock-up today. It was a little loose through the bust and hips, but as cotton duck has some bias stretch whereas the coutil I'm going to use on the finished product does not, I'm going to stick with the sizing. The waist cinched in nicely, and I was quite happy with the shape. It was, however, too long on the bottom, so I marked with a pencil the almost 2" that need to be removed in some places, while also realizing that it's a bit too short on top. I added half an inch in front, curving it around to a full inch in the very back. It was comfortable, and I think it will turn out very nicely.
 The mock-up. That weird dark strip in the very front is just a shadow. The black bits poking me in the boobs is the tops of the zip ties I used for temporary boning. The top of the corset hits me right at nipple height, which I find annoying.
 The roughly drawn pencil marks are where the corset should end, tested while I was sitting down, as well as by inspection in the mirror.
 The new lines, added to the pattern draft.
The corset was tested using the new lacing strips I made, following this tutorial by Bridges on the Body.
The corset was tested using the new lacing strips I made, following this tutorial by Bridges on the Body.
Subscribe to:
Posts (Atom)