Thursday, August 28, 2014

Historical Sew Fortnightly #16

With Crowley's skirt finished I can finally move on to bodices. The project is really starting to pull together, and since I'll probably have my nose to the sewing machine for the next couple of days I figured I'd make my HSF post early.

The term I decided to use was actually from a recent post: Brocade.

You can see the black on black patterning on the fabric to the right.
Crowley's skirt uses a black damask as the center front panel, with a black shirting cotton for the main body.
My phone makes it look bluish. It's not.
Crowley as a character wears all black, with simple tailored lines and a black brocade tie as the only shine against flat black.
For my Victorian Femme Crowley, the damask takes the front and center, while the rest of the skirt is bustled up in a frothy period look.
Close-up. Center front on the right. Skirt is bustled in three sets of three pleats, perfect of the son of a witch.

The Breakdown:

The Challenge:  #16 Terminology

Fabric:  Black cotton shirting, polyester damask

Pattern: 1880s skirt pattern, from Janet Arnold's Patterns of Fashion 1860 - 1940

Year: Mid-1880s

Notions:  Black cotton thread, polyester ribbon braid, cotton twill tape, polyester ribbon, plastic buttons, hooks and bars

How historically accurate is it?  The technique is good, but the damask is synthetic, as is the trim. I ran out of cotton twill tape for bustling, so one of the interior ties is polyester ribbon. Maybe 50%?

Hours to complete: 10ish

First worn:  Not worn yet

Total cost:  $25-40. I don't remember how much everything cost.

Tuesday, August 26, 2014

Attack of the Sewing Accomplishments

I have been steamrolling through projects, finishing things and marking them off the list. Motivation has been high, and with all the undergarments done I am excited to be working on the bits that people will actually get to see. However, obsession is starting to set in, so I am taking a break today to remember to sleep and eat. (When I get too into a project, I skip meals and start start shaving time off of my sleep schedule in order to keep working on it. I don't want that to happen with this project; I want to work in a relaxed, healthy pace. So I get a day off.)

Things completed include Crowley's bustle:
Made larger than the others for more effect. Black twill stitched in red with purchased bias tape around the edges.
Laying down
Crowley's petticoat:
I didn't have enough fabric to make it as poofy as I'd like, but I did have 2/3s of a yard of 50inch wide black lace that I bought as a remnant to add a bit more volume. It helps.
On hanger with bustle underneath, assisted by my wonderful husband. (Sorry it's so blurry)
Gabriel's skirt:
While being tried on for length (the TARDIS shirt is because this was right before a group of us sat down for the season premier of Doctor Who)
Side view
Completed. The skirt is an indigo cotton, flatlined to a heavier cotton. It is trimmed in green bias tape, made from the same fabric as her jacket will be made from. The contrast panel is a silver-grey cotton/linen blend, to hint at her angelic heritage.
Close-up of the buttons. These same buttons will be used on the jacket, and smaller matching ones used on the bodice.
Gabriel's bustle-petticoat combination needs to be taken in (she lost to much weight while doing fieldwork) and everything listed still needs closures, but I still count them as done.

Crowley's skirt is about 80% done.
All of the panels are sewn together.
Better image of the color. The ribbon trim that you see between the two fabrics is only on one side. I still need to apply it to the other.
The main body of the skirt is extra long and pleated to the center front piece. Twill tape will be added with the waistband, and the skirt will be bustled in the back. Once the other side of the ribbon trim has been added, all the skirt will need is a waistband (with hanging twill ties) and a hem. Should have it finished (minus the hem) in time for the next HSF challenge.

Current checklist:
Chemises - Completed
Drawers - Completed
Corsets - Completed
Bustles - Completed
Petticoats - Completed
Skirts - 4/5 Completed
Bodices - 0/5
Overskirts and accessories - 0/5

With just over two months left on my timeline, expect to see completed outfits soon.

Wednesday, August 20, 2014

Things I've learned About Making Victorian Undergarments

I just finished Crowley's bustle and petticoat, so I thought I'd post some details about what I've learned from this whole pile of crazy. I am no expert, but these are some things I googled and failed to find results for, so I'm putting out what worked best for me.

Chemise: Make it out of thin, soft, breathable fabric.

Drawers: Drawers do not look good. Period. They're weird. Now, if you make them out of thin fabric, and trim them well, it distracts from the camel-toe front and sagging ass back, but they still aren't sexy.

Corsets: Make them longer than you think you'll need. Once you do a fitting you can trim them down a bit, but it's always better to go longer. For a single layer corset use bias strips for your channels. If you are covering your coutil in something pretty, stitch your boning channels to the inside. If you need exterior boning channels, stitch your pretty fabric and your coutil into a tube, press flat with the seam centered, and then trim the seam allowance.

If you try to do bias of pretty and bias of coutil layered on top of one another, there will be shifting and fraying and uneven-ness. If you stitch the pretty and the coutil together into a tube, trim the seam allowance, and then press, there will be fraying. Better to make a tube, press first, and then trim.

When possible, do a final fitting before all the seams are finished, in case there needs to be any minor tweaking. And always stitch pieces together, then press to one side and stitch down 1/16th inch away from the seam, then finish as you please (flat-fell into a boning channel or trim and cover with bias channel). Stitching each seam twice will let you sleep easy knowing that spontaneous corset explosion is not on the docket.

Bustles: Online tips suggest light fabric, but get the light side of well woven fabric, like twill, or heavy quilter's cotton. Making bustles out of muslin just starts a mental countdown of how long you have until it tears and you have to make another bustle.

If you are making a bustle out of an online guide (like this one) and have never made one before, two-thirds of you corseted high hip measurement makes a nice sized bustle. (So if, with your corset on, your high hip is 30 inches, the top bone of your bustle should be around 20 inches, at least if you want a bustle that looks like those I've made.) You can obviously go larger (Crowley's is the only bustle that is larger that that proportion), but if you were wondering where's a good place to start, that's where I started.

In the American Duchess guide I linked, she put the apex of her top bone 4 inches from the waistband edge. Do not put it closer to the edge than that, or the angle gets pretty extreme. If you are a larger woman, you might want the apex 5 or 6 inches from the waistband, so there is room for your butt and the bustle won't try to ride up.

Petticoats: If you are short (i.e. less than 5 feet tall), and don't mind a petticoat that lacks fluff, you can kinda get away with 3 yards of 44 inch wide material. Otherwise, you want closer to 4 or 5, in order to make ruffle-y bits. All of my petticoats followed the same basic pattern. I cut the front and the side fronts as shown, but I cut the back and back sides only to knee length (usually about 25 inches for the side backs and 26 for the back). Side backs and back stitched together to about 50-55 inches at the bottom, so I made a ruffle out of a 100-120 inch long strip, and wide enough to reach the skirt's finished length, and stitched it to the back. Then the petticoat back can be stitched to the front half, along with a placket for closures and a waistband.

For Samifer's, the whole thing was made about 6 inches shorter, and a pre-gathered eyelet band was added to the bottom. Most have cording thrown in the back, to keep it fluffy, and Dean's has two rows of ruffles. Crowley's was made 4 inches shorter, because she's just that short, and lace was added to make up for the lack of ruffle (her ruffle was only 65 inches, stitched onto the 50 inch back, because I ran out of fabric).

That skirt pattern makes for a super fluffy petticoat for a woman with a 26 inch corseted waist. It makes a decently fluffy petticoat for a woman with a 30 inch corseted waist. Larger than that, and I suggest adding width to each piece to keep the fluff. For Castiel, I subtracted 26 inches from her corseted waist measurement, then divided the difference by the number of skirt pieces, and added that much on to each. Or you could just add where you like. (To a super fluffy petticoat for a 30 inch corseted waist, you'd want to add a total of 4 inches to the pattern, which you could just add an inch to the side back and half back pieces, making 4 inches overall. That way the extra width is concentrated in the back where you want it.)

Pictures of Crowley's bustle and petticoat will follow soon, but for now I'll let you digest that brick of text.

Tuesday, August 19, 2014

Historical Sew Fortnightly #15

Short post, and a bit late, but I made a walking skirt!

This skirt is made using the same pattern as all of my late 1880s skirts, but altered to be larger for the wearer. It is unlined, so it's not overly hot to wear.
It has an eight inch deep hem facing, as well as half inch horsehair braid to keep the hem wide and easy to walk in. This skirt was made for Castiel for my Victorian Femme Supernatural Cosplay project.
This skirt has the best waistband of those I've made thus far; it is two inches wide, faced, and was cut slightly curved so there is no bunching or folding. The skirt closes with two buttons on the waistband and two hooks and bars on the placket.

It's pretty simple, but practical and comfortable. Photos of Cas wearing it soon to follow (hopefully!)
The Breakdown:
The Challenge: #15: The Great Outdoors

Fabric:  Black linen/cotton blend

Pattern: Janet Arnold's Patterns of Fashion 1860-1940, 1880s skirt

Year:  mid-1880s

Notions:  Black cotton thread, two hooks and bars, two buttons, 120" half inch polyester horsehair braid

How historically accurate is it?  Very, minus the polyester and the fact that the buttons are plastic. 90-95%?

Hours to complete:  Didn't count, maybe 15 since the handmade the buttonholes and hand-stitched the hem facing.

First worn: Not worn yet

Total cost:  ~$35

Tuesday, August 12, 2014

Pictures!

So I realized that I never posted the pictures of Gabriel in her corset, so here you go:
As you can see, Gabriel has no ribcage, thus she hourglasses really well. It has also been decided that she has five gallons of tits.

Crowley's corset is done minus the flossing. She had to leave before I was done binding, so I laced her into it unfinished so I could take her measurements before she left.
You can see the part of the top binding hanging loose, but it was sound enough to try on. Ignore the lint on her chemise.
So scandalous
I finished the binding after she left, and added trim.
Need to buy lacing and floss, but it's basically done.
Close-up of trim, and a better image of the color. The corset is a olive green silk, stitched with gold silk thread, and bound in a chocolate brown silk. The trim is some polyester stuff that I had kicking around, and it matched nicely.

I realized that I didn't buy nearly enough fabric for Castiel's outfit, so I was barely able to cut out all the skirt panels. I'll be able to make the placket, and maybe the waistband, but there isn't enough left for the hem facing and the bodice, so I'll be buying more come payday.

Plans for this month include finishing all of Crowley's undergarments, and all of the skirts. Maybe a bodice or two as well. We'll see where I get.

Monday, August 4, 2014

I did the thing!

So when I started the Victorian Femme Supernatural Cosplay project, I sat down and drew up design sketches for each of the outfits I was making. However, I knew that none of the designs would survive the creation process as-is. They were influenced by the Late Bustle period, but they weren't period proper. As I continued to look at more and more fashion plates and surviving garments online, I became more and more disenchanted with my original designs. So a little while ago I sat down and drew a new design for Samifer. This was the original design:
In the show Samifer wears a white suit with a cream shirt. I drew a white suit top, cream shirt and cuffs, white embroidered skirt and a cream over skirt. It's . . . costume-y. It definitely doesn't look like what was worn in the late 1880s. I wanted the skirt to have a train, and I realized most of the trains are on overskirts, not usually on the underskirt. I looked at reception dresses of the time, which have the trains I liked, but more restrained and with longer sleeves than ballgowns, and I came up with this:
A pleated cream false shirt with a white false vest, white bodice with pleated ribbon trim, white cuffs with lace and cream pleating, white overskirt with lace and buttons, and a white underskirt with cream pleating and ribbon.

The skirt was easy, it was flatlined with muslin and sewn the same as all the petticoats. A hem facing was added, and then came the cream pleats.
And they just kept coming.
See that giant pile of fabric hanging off the ironing board and onto the floor? Yeah, I pleated all 360 inches of that into half inch pleats. Over the course of three days, stopping when the board was full to press them with vinegar. It worked like a dream.
You can see to the left that the vinegar pressed pleats are flat and crisp while on the right the freshly ironed but no vinegar pleats look loose. After pressing the pleats were basted together, moved to the far end of the ironing board, and the next section was pleated. The finished pleats were machine sewn to the skirt, and then covered by ribbons that were hand tacked on.
The bottom ribbon is a plain white and the top is slightly sheer with gold stripes straddling a brocade pattern.
'But wait!' you say, 'what's that red peeking out?' You know that hem facing I mentioned? Well it wasn't white, and it wasn't turned to the inside.
Under the pleats is a fiery rose pattern, to be glimpsed as the pleats shift and bounce. Because we ARE talking about Lucifer.
Here's a picture of the hem facing before the pleats were added. It was an eight and a half inch strip of bias tape, sewn to the wrong side, and then turned the the right side (encasing the seam). The top half inch was turned under and hand sewn in place.
The inside of the hem facing. The skirt length was measured on Samifer and cut off at the exact length, so an extra half inch was added to the hem facing so the skirt would be the same length when finished.
The finished skirt. The overskirt will be made later, after the necessary fabric has been measured for the bodice.

Next up will be Castiel's skirt, since her petticoat is now finished.
It's about two inches too short in the back, so her skirt will be cut longer so make up for it (they're both based around the same pattern). Hopefully an update on that will follow soon.

Friday, August 1, 2014

Historical Sew Fortnightly #14: Paisley & Plaid

This is one of those challenges that lines up perfectly with my own deadlines. I wanted to finish my skirt by the end of July, which features plaid. I actually finished the skirt about a week ago, but was unable to get picture at the time. Now that I live in a house full of people, it was much easier to rope someone into taking photos (my husband is always willing to snap pictures, but he fails to comprehend that picture taken for a costuming blog should be focused on the costume.)

Although Dean tends to wear plaid shirt less often than his brother Sam, he still wears a buttload of plaid.
That man's face should be illegal
But I decided early in the planning stages of these costumes that I was using the clothes on the show as inspiration, not direct outfits. I could simply do a blue denim colored skirt with a green Henley-style shirt front on a plaid bodice with a leather jacket and be Dean. But that felt like I was taking the outfits on the show and forcing them to look Victorian, rather than using Victorian principles and designing costumes that the characters would wear if they lived in that time period. With that idea in mind I moved the plaid to the skirt, going for a pleated, active wear look that would blend mobility with style. (Also, there are hidden slits so I can hide things and access them later.) The result:
The blue of the shirt is a little darker than the photo, but you can see the teal plaid nicely. The plaid sections are flatlined since the fabric was a bit on the light side.
In order to make the pleats hang more evenly a half moon of blue fabric was added to the waistband so the pleats would fall from the edge of the bustle.
The pleats aren't as sharp as I'd like, despite ironing them with vinegar and top-stitching, but the skirt still looks good.
Close-up of the plaid
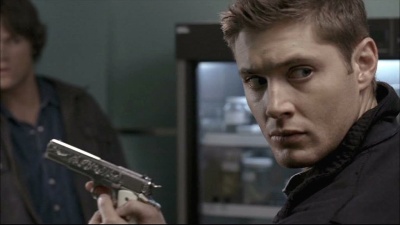
An overskirt is going to be added later. You can't really tell from the photo, but the fabric is ivory with a floral brocade, a homage to the gun Dean favors.
Floral scroll work and a mother-of-pearl handle. Talk about a classy way to die.
Just the facts:
The Challenge: #14 Paisley and Plaid

Fabric: Navy blue broadcloth and Teal Plaid quilters cotton, white muslin for flatlining.

Pattern:  No pattern used, just math and draping

Year: 1884-1889

Notions:  Navy blue polyester thread, teal cotton thread, hook and bar closure

How historically accurate is it? Skirt closure is on the wrong side, and most of the stitching was in polyester thread, but the hem is hand tacked to keep it invisible and the techniques are solid. I'd say 95%

Hours to complete:  Lots. Cutting and flatlining took a while, since the plaid wasn't printed exactly straight of grain. Ironing took an entire day, as did topstitching. I'd put it in the realm of 25-40 hours.

First worn: The day it was completed. I didn't want to take it off.

Total cost: About $25