Showing posts with label 18th Century. Show all posts

Wednesday, February 10, 2016

Thrift Store Finds

So my work is allowing us to wear costumes and different things for a small donation to a charity this month. I've been participating as much as I can, partially out of my own desire and partially to help lead the rest of the team. Today is Star Wars Day, and I didn't want to pay $2 just to wear a t-shirt. So I got creative. White shirt and pants from Goodwill, a baseball cap and Sharpies from work, and ta da!
Geeky pick-up line: Hey, am I the droid you're looking for?
A decent BB8 costume for less than $15. I'm pleased with how it turned out, and it's something I can easily wear again when the next movie comes out, though I do need to take the pants in a little.

While purchasing the components for this costume, I came across something beautiful.
Beautiful
The shirt is a patterned silk, flatlined to a coarse cotton, and covered in embroidery and beads down the front and on the sleeves.
Close-up of embroidery
By the shape and the style of it, I think it would make a perfect 18th century men's waistcoat. The embroidery on the sleeves will become the pocket flaps, and the shape will be changed to reflect the time period. Now the main question, do I make it for my husband, or myself ;)

Sunday, July 26, 2015

Historical Sew Monthly #7

After the stays I made last month, I wasn't done with the fabric. I loved the yellow, with the purple trim, and linen tape, and silk thread and I wasn't entirely ready to give any of it up just because I had completed the project. However, I didn't really have much to work with: some decent scraps of the yellow, just over a yard of the purple bias tape, couple of feet of the linen tape. Suddenly a memory of a blog post I had read came back to me.

A housewife, from Slightly Obsessed 
A housewife is a lovely accessory, adds character to your outfit, and keeps your necessities close at hand. I hate going out in costume without a sewing kit (just in case) and housewife is a period way to keep everything together.


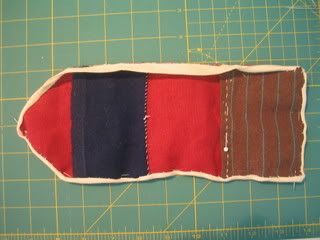
My housewife started out as a 5 in by 14 in rectangle. Seam allowances were added, the top was curved, and four layers were cut. The exterior is the yellow of my stays, there are two pieces of canvas as interlining (one is loose to keep the exterior smooth and one was flat lined to the interior layer to prevent the pockets from causing it to bag), and the interior is simple muslin. First was the pin cushion, which was stitched down, folded over its seam allowance, and basted to the seam allowance on two sides. Then the brown floral pocket. Top edge was hemmed, and then it was basted to the seam allowance. Third, the blue flannel, was edged with a blanket stitch and basted. I also added a seam off-center to divide the pocket in two. The red check, leftover from my bustle era wrapper, was trimmed with the purple bias tape and basted. Then I embroidered my initials onto the outside, put the layers together, and stitched the bias tape to the outside. When I got to the open edge of the pin cushion I stuffed it with scraps of fabric and then continued sewing. At the top I stitched the folded linen tape into the seam for a closure.

I didn't worry about centering my initials, so they're a little off. But on period examples they're usually off-center as well, so I'm not bothered.

Closed. Inside I have my Merchant and Mills black scissors, my tailor's thimble, and some pins and needles. I bought some wood which I cut to make thread winders, but I still have more work to do on those.

The Challenge: #7 - Accessorize
Fabric: Scrap of yellow floral, scrap of cotton canvas, scrap of muslin, scrap of red cotton gingham, brown floral fat quarter, and a bit of some flannel snuggly pants destined for the trash.
Pattern: My own, based on period examples and a tutorial from Slightly Obsessed. 
Year: 18th century
Notions: Silk thread, bias tape, linen tape, embroidery floss
How historically accurate is it? Totally handsewn, which is good. Too much cotton, there should be more linen fabrics in it, and I don't know about the patterns, but using scraps from other projects is completely accurate. Not sure how accurate finishing all the pockets differently is, that was just something I wanted to do. I'll give it 90%
Hours to complete: Started on the 1st, finished on the 3rd, worked about 2 - 3 hours a night. So maybe 9 hours, if we round up? Probably more like 6.
First worn: Not really a wearing thing, but I've been using it since before it was even finished to keep my scissors and thimble close by. 
Total cost: Everything was a scrap or a leftover from a previous project except the brown floral, which was in a bag of vintage sewing notions I got for $10. So the whole piece may have cost me $0.50, of which I only used a small bit.
Now, mid-June I started the project I intended for this challenge: A pair of stockings. I used yarn I had bought previously, and this pattern from Mara Riley to draft my own pattern for my size and gauge and got to work. I knit at a gauge of 9 stitches per inch, completely in the range for period stockings (for wool ones at least), did garter stitch ridges at the top (using the period method of wrap and turn), purl ridge faux seam at the back, three needle bind off heel and toe. The changes I made include slipping the first stitch on every row of the heel flap, which I like better and is easier when it comes to picking stitches for the gussets, and on the second stocking I began decreasing the center of the heel half an inch from bind off. On the first stocking there's a little triangle piece that sticks out from the back of the heel. I'm sure wear will eventually smooth it out, but it bothered me, so on the second I tried to eliminate it with decent success. 
Black wool stockings
These stockings possess the magically property of picking up any and all white lint in the area. But the fit is wonderful.
The Challenge: #7 - Accessorize
Fabric: None
Pattern: Mara Riley's 18th century stockings
Year: Honestly I intend to use these stocking for Renaissance right up through Edwardian, but they'd but most accurate in the 1740s - 1850s
Notions: Three balls of SRK On Your Toes Four ply sock yarn
How historically accurate is it? Yarn might be a bit fluffy, period stockings were made for durability not softness, and this yarn is 25% nylon with aloe vera added. The pattern is perfect, minus my alterations, which are minor. I'm going to say 75%, since the yarn is 25% inaccurate.
Hours to complete: Oh god, lots? The first stocking was mostly done on lunch breaks at work since I was sewing my stays when I got home. The second stocking was my only project and took me 18 days, 2 - 4 hours after work most days and 6 - 8 hours on my days off. Even estimating 3 hours a day that still puts me at triple digits for both, so I'm just going to say 100+ hours.
First worn: For sizing and such. I need to get some ribbon to use as garters so I can actually wear these things.
Total cost: The ball of yarn I had on hand when I started was $13, but when I went back for two more balls it was on sale for $10.80 each, making my total $34.60.

Wednesday, July 1, 2015

Historical Sew Monthly: Out of Your Comfort Zone

Sometime last year I decided to start sewing some 18th century stays. I found lovely fabric, hand-painted thread, 1/8th inch bamboo pieces, and I started sewing. I hadn't even finished the first piece when it struck me: I didn't do a very good mock-up. I don't have enough thread to machine sew it. What if I'm spending hours and hours refining my backstitch only to discover that the stays didn't fit right? I then did what any reasonable person would do: I shoved it in a bag and promptly forgot about it.

Fast forward

Like many, I have been watching Outlander. And like many, I have a favorite dress, the one Claire wears to the Gathering. This one:

From Terry Dresbach's blog
I found a lovely print to use for the petticoat and stomacher (before I realized they were embroidered. Doesn't matter, I'm sure as hell not going to embroider a petticoat.) I also found a beautiful plaid-ish wool for the gown itself. (Posts on both of these fabrics later.) But step one is neither the gown, nor the stomacher, nor the petticoat. Step one is stays. (Okay, technically step one is a shift, but I already have one so I can skip that step.)

I did a bit of research into making stays, and found that the pattern in Costume Close-Up is almost perfectly my size. That pattern is also dated 1740 - 1760, making it the right time period. I copied the pattern, mocked it up, and made adjustments.

Quite a while ago while visiting my parents my mom took me to a garage sale that was getting rid of a ton of fabrics for $1 a yard. I, of course, spent nearly $50 and took home a giant box of fabric. I knew there had to be something in that box I could use for stays. I wanted it to be nice enough that if the stays turned out well I'd like them, but not so nice that I'd regret losing the fabric if they turned out poorly. What I settled on was this:

A creamy yellow cotton with a nice floral pattern. I had a yard length, but not the full width. One side had the selvage but the other side was serged. Stays were likely the biggest thing I could make out of the fabric, and the pattern seemed right to me for the 18th century (I could be very wrong.)

I used two layers of canvas for the interfacing, and machine stitched 1/4 inch channels on every piece. I machined the pieces together, boned them with zip ties, and tried them on again. I had to take in the waist a bit more, but then I finished boning, whipped down the seam allowances, covered the seams in tape, and bound them.

The front. The eyelets are handstitched and set for spiral lacing.

Close-up. The tape over the seams is a natural colored linen with three stripes of yellow running the length. The bias tape is a purple cotton in a gingham print. I wanted purple binding and this is what I could find.

The lining is muslin, hand stitched to the completed stays.

I am not sure how I feel about these stays. I'm not sure about the fit, but I also don't know where to take them in to improve the fit. I also just don't know how to feel about a thing the somehow removes your boobs while maintaining your cleavage. They're weird, they're definitely outside of my comfort zone, and I'm trying not to pass judgement until I've got the rest of the outfit together. (Note: my shift is supposed to have a drawstring for the neckline. I was too lazy to find one, thus the sleeves falling off my shoulders.)

The lacing is purple silk ribbon.

The breakdown:

The Challenge: Out of your comfort zone
Fabric: Yellow cotton quilting for the exterior, cotton canvas for the interior, muslin for the lining
Pattern: Stays 1740 - 1760 from Costume Close-up
Year: 1740s
Notions: Natural and yellow linen tape, purple gingham bias tape, yellow and purple silk thread, white cotton thread, purple silk ribbon, 1/4 inch zip ties, two metal bones by the lacing holes.
How historically accurate is it? The channels were machine sewn, and the seams were also machine, the seam tape and bias tape were sewn by hand, the seams were whipped down by hand, eyelets were hand sewn, pattern was perfect, but the fabric was mostly cotton when linen would have been more accurate. I'd say 40%.
Hours to complete: I'm going to say 40 - 50. A large amount of my days off have gone into this, plus 2 -3 hours every night after work.
First worn: Tonight, for photos
Total cost:  Fashion fabric was $1, canvas was $10, thread was $7, muslin was $1, zip ties were $10, bias tape was $9.50, linen tape was $20, and the silk ribbon was $16.50, making the total: $75. 

Sunday, July 13, 2014

Mope

On Friday I received some bad news (no one died, but it was still life changing news). I cried, I panicked, I got over myself and made an action plan. Things are going to be okay, but it's scary and I'm going to be busy over the next few weeks.

Yesterday was spent moping. Do you have mope days? You don't cry cause 'been there done that' and you don't need the headache, and you don't really freak out because it won't lead anywhere so you'd rather not take that path; you just ignore all your responsibilities and sit around to prove to yourself you still have control of your life. One of those days where chocolate, pickles, and ramen all sound equally good and you'd eat all three if you had 'em. One of those days where you need a small, brainless project that you know you can finish before dinner just to feel a sense of accomplishment. One of those days where a Netflix marathon is its own form of therapy. A Mope Day.

Yesterday was a Mope Day and I decided to make a set of pockets to go with my new petticoat. I pulled out fabric I'd been planning on using for pockets:
Drafted a pattern by hand, cut out four pieces, cut a slit in two, and bound the pieces together by hand using bias tape. The result:
I used the cotton twill tape the I had wanted to be my petticoat waistband to be the pocket ties. There was just enough to be able to tie it around my waist, so I stitched the pockets to it.
Over normal clothes, because I don't have full 18th century undergarments
The pockets are only attached to the waistband at the corners, since stays and a bum pad will likely change the placement. If I have to move them I can do so easily, and once I'm sure of placement I'll stitch the top of the pockets to the waistband as well.

The Challenge: #13 Under $10

Fabric: Cotton print bought years ago

Pattern: Made by me, based on the shape of existent pockets

Year: 18th century

Notions: Green thread, cotton twill tape, and pre-made bias tape

How historically accurate is it? The print is wrong, and both the bias tape and thread are cotton-poly blends. But the shape and construction are good. 75 or 80%?

Hours to complete: 5ish. The first pocket was done in an hour and a half, but the second took longer because I had to keep pausing to help my husband hack the terminals in Fallout 3. I am a pro at hacking in that game.

First worn: Just for the photoshoot

Total cost: Fabric was a remnant, I think it cost between $2-$4. The bias tape was a $1 clearance item, the thread was a gift and the cotton twill was leftover from a previous project. So total about $5.

Friday, July 11, 2014

Historical Sew Fortnightly #13: Under $10

Sometimes, luck is on your side. Serious luck. A few months ago I was at a local Goodwill when I found this:
Not a bad dress, but not really my color. But there was something about the shine, the texture:
Holy shit, it's pure silk. And also, MINE! (I have a particular weakness for thrift store silks.)
The dress is an off the shoulder affair, a size or two too big, with pleated details.
You can notice that the shoulder strap is pinned about an inch to keep it from falling off, and the pleated detail of the skirt. Also, I really need to clean that mirror.
The entire skirt is pleated the entire way around, with an obvious seam at the waist. I don't think this could scream "petticoat!" any harder.
A look at the interior proved that someone upstairs likes me. (Of course the goddesses of costuming live upstairs, it's the best way to make a grand entrance.) In the photo you can see two lines of stitching, one for securing to skirt to the bodice and another for securing the pleats. Which means when I separate the top from the bottom, the pleats will stay there, perfect and waiting for a waistband.

So I did just that. After removing the few points where the lining was secured to the seam allowance, I used my seam ripper to remove the zipper. Then I separated the top from the bottom, careful not to break the thread so I'd have it for the stitching later. After the skirt was freed, I whip-stitched the zipper opening shut.
The crappy, uneven stitches in the middle of the photo are mine.
The skirt also had side seams, to ease the transition from bridesmaid dress to 18th century petticoat. Another bit of luck, the seam allowances were serged separately, so they could be pressed open. Ripping out serging sucks, and I was happy to be spared it. I measured nine inches down from the edge, marked it, put in a half dozen stitches to stop the seam from opening farther than I'd like, and then cut open the seam. I also put in a bar tack at the bottom, to lessen the pull on the seam.
From there I measured some ribbon (I.E. I wrapped it around my waist, tied it in a bow, cut off that much, and then cut a second piece the same length), centered it over one part of the petticoat, folded it over, and stitched it down hiding the raw edge of the skirt. Then I did the same to the other side.
The excess I left hanging as ties. The ribbon isn't really the same color, burgundy as compared to a fuchsia, but they both have shine and in poor lighting look similar. I was going to use cotton twill tape, but I didn't have enough. I put in a few tacks to make sure the seam allowance by the pocket slits won't roll to the outside and I was done.
The hem circumference is modest by most standards, only 90 inches, but it's a good basic piece. It's also long enough to handle some fluffing without going all flood warning. Right now the petticoat has no accompanying outfit, but I have plans. I still have the bodice, and will likely cannibalize it for trim and details that will say "I intended to make this outfit with a non-matching skirt," instead of "I couldn't afford fabric."

The breakdown:
The Challenge: #13 Under $10

Fabric: Fuchsia colored silk

Pattern: I used this guide by A Fashionable Frolick: http://fashionablefrolick.blogspot.com/2011/04/threaded-bliss-tutorial.html (For some reason blogger isn't letting me do links.)

Year: 18th century, but likely to be worn for a number of periods, if only for the rustle.

Notions: Matching thread obtained from original dress, burgundy ribbon left over from another project.

How historically accurate is it? In styling, very. It has a narrow hem, slits for pockets, and heavy pleating. However, since I didn't deconstruct it and remake it by hand, it also has machine stitching, serged edges, and polyester ribbon as the ties. I'd say it's about 70% accurate, since you'd have to look at the wrong side and hidden edges to notice it's machine made.

Hours to complete: Three and a half.

First worn: For the photo shoot

Total cost: If you include the ribbon $7. If you don't since it was leftover from a previous project, $4. I am a thrift store ninja.