 |
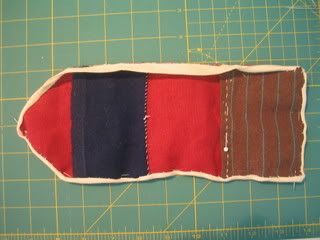
| A housewife, from Slightly Obsessed |

My housewife started out as a 5 in by 14 in rectangle. Seam allowances were added, the top was curved, and four layers were cut. The exterior is the yellow of my stays, there are two pieces of canvas as interlining (one is loose to keep the exterior smooth and one was flat lined to the interior layer to prevent the pockets from causing it to bag), and the interior is simple muslin. First was the pin cushion, which was stitched down, folded over its seam allowance, and basted to the seam allowance on two sides. Then the brown floral pocket. Top edge was hemmed, and then it was basted to the seam allowance. Third, the blue flannel, was edged with a blanket stitch and basted. I also added a seam off-center to divide the pocket in two. The red check, leftover from my bustle era wrapper, was trimmed with the purple bias tape and basted. Then I embroidered my initials onto the outside, put the layers together, and stitched the bias tape to the outside. When I got to the open edge of the pin cushion I stuffed it with scraps of fabric and then continued sewing. At the top I stitched the folded linen tape into the seam for a closure.


The Challenge: #7 - Accessorize
Fabric: Scrap of yellow floral, scrap of cotton canvas, scrap of muslin, scrap of red cotton gingham, brown floral fat quarter, and a bit of some flannel snuggly pants destined for the trash.
Pattern: My own, based on period examples and a tutorial from Slightly Obsessed.
Year: 18th century
Notions: Silk thread, bias tape, linen tape, embroidery floss
How historically accurate is it? Totally handsewn, which is good. Too much cotton, there should be more linen fabrics in it, and I don't know about the patterns, but using scraps from other projects is completely accurate. Not sure how accurate finishing all the pockets differently is, that was just something I wanted to do. I'll give it 90%
Hours to complete: Started on the 1st, finished on the 3rd, worked about 2 - 3 hours a night. So maybe 9 hours, if we round up? Probably more like 6.
First worn: Not really a wearing thing, but I've been using it since before it was even finished to keep my scissors and thimble close by.
Total cost: Everything was a scrap or a leftover from a previous project except the brown floral, which was in a bag of vintage sewing notions I got for $10. So the whole piece may have cost me $0.50, of which I only used a small bit.
Now, mid-June I started the project I intended for this challenge: A pair of stockings. I used yarn I had bought previously, and this pattern from Mara Riley to draft my own pattern for my size and gauge and got to work. I knit at a gauge of 9 stitches per inch, completely in the range for period stockings (for wool ones at least), did garter stitch ridges at the top (using the period method of wrap and turn), purl ridge faux seam at the back, three needle bind off heel and toe. The changes I made include slipping the first stitch on every row of the heel flap, which I like better and is easier when it comes to picking stitches for the gussets, and on the second stocking I began decreasing the center of the heel half an inch from bind off. On the first stocking there's a little triangle piece that sticks out from the back of the heel. I'm sure wear will eventually smooth it out, but it bothered me, so on the second I tried to eliminate it with decent success.
 |
| Black wool stockings |
 |
| These stockings possess the magically property of picking up any and all white lint in the area. But the fit is wonderful. |
The Challenge: #7 - Accessorize
Fabric: None
Pattern: Mara Riley's 18th century stockings
Year: Honestly I intend to use these stocking for Renaissance right up through Edwardian, but they'd but most accurate in the 1740s - 1850s
Notions: Three balls of SRK On Your Toes Four ply sock yarn
How historically accurate is it? Yarn might be a bit fluffy, period stockings were made for durability not softness, and this yarn is 25% nylon with aloe vera added. The pattern is perfect, minus my alterations, which are minor. I'm going to say 75%, since the yarn is 25% inaccurate.
Hours to complete: Oh god, lots? The first stocking was mostly done on lunch breaks at work since I was sewing my stays when I got home. The second stocking was my only project and took me 18 days, 2 - 4 hours after work most days and 6 - 8 hours on my days off. Even estimating 3 hours a day that still puts me at triple digits for both, so I'm just going to say 100+ hours.
First worn: For sizing and such. I need to get some ribbon to use as garters so I can actually wear these things.
Total cost: The ball of yarn I had on hand when I started was $13, but when I went back for two more balls it was on sale for $10.80 each, making my total $34.60.
Wow, I admire your stockings. That is a lot of work, and they look great.
ReplyDelete