Showing posts with label Bustle Era. Show all posts

Thursday, January 28, 2016

NEW SHOES!!!

I have been craving some American Duchess shoes. Particularly, a pair of button boots. I've had a special fondness for the Tavistock, the taller version. But at $230 for a pair, I couldn't rationalize spending that much for costuming shoes. Then one night, I couldn't sleep, so I had a cup of tea and read blogs. I stumbled over to the American Duchess website, and found out there was a MASSIVE SALE.

I've been planning an evening costume, so I was immediately pulled to the Tissot, the simple Victorian pumps. Dyeable white satin, and only $55, instead of the usually $125. And the beautiful white Tavistock, only $99. I'd have preferred black, but for that price I'd deal with white.

In the morning, I measured my feet to figure out my size. I'm a 9. There were still 9's in Tissot, but only 8.5's for the Tavistock. They were wide calf, which is good for me. I figured for that deal I could put up with pinched toes, and I can sometimes fit an 8.5 anyways so it might not be that bad. So I ordered both.

And today they arrived.


First, the shoes. They are gorgeous. Lovely stitching, soft leather, smooth sateen. The Tissots came with replacement heels and a little card made of the sateen and leather of the shoes. The Tavistocks came with two replacement buttons and a buttonhook in a little blue velveteen bag. Both shoes also came with lollipops, which is awesome!

Second, the fit. Both shoes fit perfectly . . . which shouldn't be. I don't know if the Tissots run small or if the Tavistocks run big. The Tavistocks are loose through the ankles, which I need to do something about for personal perferrence. I'll probably move the buttons there over slightly, to give me more support. The soles offer great support, even though I normally have problems with heels.

Final verdict: I love them. LOVE them. I haven't taken the Tavistocks off since they arrived. They are comfortable, and lovely. I may dye the Tavistocks, but I think I'll leave the Tissots white. I am so excited to have such wonderful period shoes. I also bought white silk stockings in order to qualify for free shipping, but I haven't tried them on yet.

*This is not an endorsed review, just my own opinions given freely.

Monday, January 18, 2016

Wow, it's been how many months?

So life caught up to me. Work and projects got me bogged down, and I simply failed to post anything I made. So, catch up.

My Halloween costume turned out wonderfully, and in good time.

I didn't bone the bodice, but I did manage to make an excellent hat from a thrift store find. I'll try to get better pictures later, but I can at least give you this. (The black cord hanging down the front is my radio. This was taken at work.) I wore this costume all day, through a full shift, then a trip to Burbank for a book talk, and then a long drive home in which I got lost. All told, maybe 15 hours? It held up well, and was comfortable considering.

Next up was the wedding dress I made for a friend.
The entire thing was patterned around a corset I made her previously. It has it's own corset inner structure, attached slip, side closure, and billowing sleeves attached at the wrist to bracelets (a la the X-men character Storm). There's some things I wish I'd done differently, but she was pleased.

And of course after the fanatic sewing of the costume and the dress, I suddenly got the itch for the Edwardian corset I've been craving for over a year. I used the Edwardian corset pattern from Corsets and Crinolines by Janet Arnold
My husband picked out the purple fabric, and I added the green for contrast.
It has black satin binding, and green lace along the bottom.
Normal Posture
Accentuating the S-bend
Large lacing gap, due to delicious Japanese dinner
I cut it too short in the back, and it's a little loose towards the bottom, which I plan to correct with a small pad stitched to the underside to add a little more oomph to my backside. I also need some bust pads to prevent my boobs from slipping down. This corset is meant to be showy enough to be worn as an outer garment, but also an accurate Edwardian corset to wear under proper attire. I do plan to add the garter clips, but I'm going to make them detachable. One thing I don't like about the pattern is that it called for 1/4 in bones next to the lacing. The inner shifts too much and bends too easier. It doesn't feel stable enough. I plan to stick with 1/2 in bones along the lacing for my future corsets. I'll get better pictures of it tomorrow, when I have daylight (and an empty stomach).

Monday, September 7, 2015

Completion

Sometimes, you just need a simple project to get lost in to make you feel better (even if you do make some Really Stupid mistakes along the way).

My September project for Historical Sew Monthly is on hold until I can get more supplies. So I decided to cut out the front piece for my Halloween costume and start trimming it. Except, without knowing how much I'll have to remove for the hem, I'm not sure how long the bottom ruffle will be. Not to mention, every fabric I found for the bottom ruffle didn't look good. I couldn't trim it until I knew how long it'd be when I put it together and I couldn't put it together until I trimmed it. Ugh!

That's when things took a turn. One day I came into work and found this:
Black tulle with a red foil blood splatter pattern. It would be perfect for the ruffle, with some plain black fabric underneath. And then I remembered, since this dress is going to have a train, I'm going to need a trained petticoat to go underneath it. And the best way to test a skirt pattern is to make it as a petticoat. I could find out how much hem to remove and how much train is acceptable.

So yesterday and today I made a petticoat. This became a "use up all the leftovers" project, because I didn't have enough muslin for the whole thing, but I could just manage the last piece on the remainder of the red gingham from my wrapper. I inherited a lot of my sewing stuff from my grandma, including a number of full bobbins in colors I'd never use. So I used them up. Whenever I'd run out of a bobbin, I'd just grab another in a color I don't care for or I don't have the original spool for, pop it in, and keep sewing. I emptied 4 bobbins on this project. With the curve of the hem, I decided to do a bias tape hem facing, and pulled out some wide olive bias tape I made WAY too much of for a previous project. When I made the waistband I stitched the front and the facing together and then stitched it to the petti, only realizing AFTER I'd stitched all the pleats down that I'd put it on backwards and the seam allowance was on the OUTSIDE. Sigh. Instead of ripping it out I trimmed the seam and covered it in premade bias tape that I had maybe 40 inches of. I also used two patterned green buttons that were the only ones in the button tin for the closure, but I sewed them on the wrong edge and had to rip them out and resew them. I'll add buttonholes later when I can corset up and try it on  . . . and trust myself to sew the holes in the right spot.

Since my inspiration image had a lot of floof, I added ruffles to the back using some organdy I got a great deal on. I know that Jennifer of Historical Sewing waxes poetic about organdy, but I'd never used it. It's stiff, super stiff, and really thin. I worried it would be difficult to manipulate and my machine would cause problems like it normally does with thin fabric. Neither of these things were true. My machine handled it beautifully, and I found it easier to manipulate due to it's ability to hold a crease.

The finished petti:
Side view. The gingham is the back panel. It is super long for photos and drags about 6 inches behind me.
Back view. The bottom ruffle is hanging off the bed. The top three ruffles are sewn straight across, lined up with the pattern. The bottom one curves with the hem. The top ruffle is 1 width of organdy, the middle two are 1.5 widths, and the bottom is 2 widths. It made for easy measurements and allowed me to use the selvages at the sides.
Buttons, after I redid them. You can also see the grey bias tape used to cover the seam allowance around the outside of the waistband.
Bias hem facing. The bias tape was unfolded, stitched down, folded to the wrong side, and then stitched at both edges to prevent it from showing on the right side.
Close-up of different thread colors.

I now have a beautiful petticoat that is fluffy beyond all imagining, and I know what to do for the skirt itself. Plus I used up a bunch of bits clogging up my sewing space. Huzzah!

Sunday, September 6, 2015

Historical Sew Monthly #8

Also known as the Norwegian skirt of learning.

My mom is 100% Norwegian. Her father and her mother's mother immigrated here. Her heritage has always had a subtle influence on her, in the foods she eats and the way she decorates her house. After taking a social psychology class and doing a report on cultural beliefs and upbringing, I can see the influence in how I was raised beyond just eating lefsa* at Thanksgiving and pulling the batteries out the smoke detector before making krumkake**. I've always had an appreciation of all things Scandinavian, particularly the everyday art like rosemaling and the embroidery inspired by it.

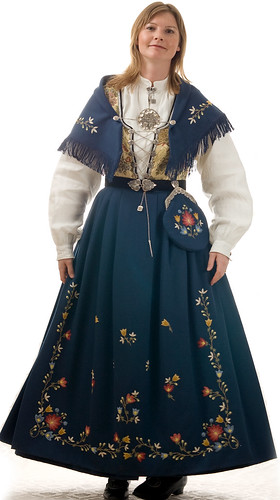
Which is perhaps why I've had a deep passion for the bunad, the Norwegian national costume.

(All images found from simply Googling "bunad")

A few years ago, my Aunt Thelma passed away. I didn't know her (in fact, I'm not sure I ever met her), but I'd always assumed she was one of my maternal grandma's siblings. Grandma came from a large family, so it made sense. My mother was mentioned in Thelma's will, and so a copy of it was sent to her . . . along with a family tree. Thelma was not my grandma's sister, as I'd always supposed. She was the half sister of my grandma's mother, Elise. Apparently my grandma's grandmother was married, widowed, and remarried, resulting in four children total. She also had the most ridiculously awesome name ever: Gunhilde Haldordatter. Gunhilde means "battle maiden" and Haldor is a male name meaning Thor's lightning (datter means daughter, showing linage)***.  With such an amazing name, I've always wondered about her and her life.

I have the clock my grandma's parents got as a wedding gift, and they were married around 1910, I believe. Assuming Elise married at 20, for easy math, that means she was born around 1890, putting Gunhilde as a young adult right through the 1880s using lazy math and assumptions, but it gives me a place to start.

Wikimedia then gave me this:
Christian Krohg - Albertine "to see the police surgeon" created between 1885 - 1887
Ignore all the beautiful bustle era confections going on in this painting, and focus instead on the sad woman being escorted by the police officer into the back, and also on the woman standing on the bench to the far right. Both wear peasant garb, black skirt with or without apron, long sleeve blouse, cross tied shawl, and a head covering. Comparing the waist size and torso shape of the woman with the officer to the fashionable woman in pink, we can tell she is wearing a corset, and is either bustle-less or wearing a very small pad. Her skirt, most similar to what has been copied into the modern bunad, is what I wanted to make. I don't know if this is something Gunhilde ever wore, but it is what I wanted.

Being that are no free patterns for bunads and information on them is extremely limited, I based mine on images around the internet, the fabric requirements from this blog, and this guide for making a dirndl (since they are similer). I used cotton flannel instead of wool, since this was a trial run, and bought 4.5 yards instead of 3.5 because my fabric was narrower. This was my first mistake. That made for far too much skirt and ugly pleating. I also made it for my normal (non-corseted) waist.

I cut off two strips for the waistband, and then cut the rest of the fabric into quarters and sewed the panels together selvage to selvage to make the skirt. (I left a few inches unsewn at the top of one for the opening.) Then I took some gingham remnant I got for a steal and stitched to the waist.
Herringbone stitch to cover raw edges
Modern bunads are cartridge pleated at the back. The gingham with its perfect quarter inch squares became the guide for the pleating.
Up, down, up, down
And pulled tight
The gingham saves you from having to mark the fabric, and provides extra body to the fabric being pleated. The pleating was too deep, and the bottom two rows were removed later. Another problem was not cartridge pleating enough of the fabric. I pleated half of the total skirt, meaning the knife pleats on the front had to be very deep to take up the rest of the fabric. I should have taken another yard at least.

I stitched on the waistband, and was so thoroughly out of love with this project that I will not be hemming it or adding a closure.
From the front (hips!)
Side proves that the woman in the painting wouldn't have needed a bustle pad if the back of the skirt was cartridge pleated.
Close-up of beautiful cartridge pleats
And close-up of ugly knife pleats. The wide box pleat in the front ended up off center because there was sooo much fabric to deal with, and I accidentally put the opening on the right side.

*lefsa is a Norwegian potato tortilla
**krumkake is a crunchy cookie kinda like a pizzelle. I think they taste like a waffle cone.
***Name translations may be wrong, however please don't correct them unless the truth is even more awesome than I believe. :)

The breakdown:
 The Challenge: Heritage and heirlooms

Fabric: 4.5 yards black cotton flannel, black and white cotton gingham
Pattern: My own, based on what information I could find
Year: 1887, but is probably correct for a long range of time periods
Notions: Black cotton thread.
How historically accurate is it? Cotton should be wool, and the hem should have a facing, but it is entirely hand sewn. 60%?
Hours to complete: Somewhere around 20 hours
First worn: Never, and probably never will be, but it was a good learning experience.
Total cost: About $20. The flannel was on sale, the gingham remnant was only about $1 and I had all the thread on hand from other projects.

Saturday, August 15, 2015

Sneak Attack

I just had an idea for a costume sideline me so hard I think it did sneak attack damage.

I was at work, minding my own business, doing my job, when I realized the previously empty Halloween party grid now had things on it. There had been talk of a zombie party at my house, so I went to investigate the new things. I was walking around it, taking it in, when I spotted this:
A Halloween stamp of a lady's skeleton, wearing a spectacular bustle dress with ruffles, and a train, and fringe. And all of a sudden, I knew what I wanted to wear for Halloween (Michaels allows employees to dress up, so I can wear it to work). The main points of the dress, if you can't see the details, is a black bodice with fringe along the bottom edge, pointed in the front but reasonably short in the back. There is the implication of a jabot at the neck. The skirt front has five rows of triple pleated contrast fabric with fringe (or possibly pleats) along the bottom. The bottom most row also has a ruffle. There is a patterned panel (brocade? beaded?) that appears to be piped that separates the front from the back. The skirt back appears to be a darker fabric, with a double ruffle that forms the train. The back is mostly hidden by a large, sweeping overskirt that comes all the way down the top ruffle and is edged in fringe.

I spent the rest of the day thinking about the dress, and didn't I have some black brocade left over from a previous project, and also didn't I buy a ton of soft gold fringe trim for a steal? After investigating the sewing closet, I came back with this:
The red is shot with black polyester that has alternating rows of black lace and a short self ruffle. The black is cotton sateen and may be enough for a bodice, hopefully (it was from JoAnns, and I may need to buy more). The gold fringe is about 12 or 13 yards, bought for the amazing price of 50 cents a yard. And the brocade:
Black on black, with some shine. I am planning on making the underskirt red, with black contrast. I would prefer fringe on the front, assuming there's enough. Failing that I'll do pleats. The brocade will be the piped panels, and may also be the overskirt if I like the look. The jabot will be a red silk I have a remnant of that will match the skirt, and I'll also add some to the cuffs to pull the look together. The second ruffle on the bottom of the back will be left off because there's no way I can have a train that long, but I think I may add buttons or ties so I can add one later.

I can use my combination, corset, and bustle that I already have made, but I'll need a second petticoat for that much skirt. I'm also thinking a bustle pad, just to give me some extra oomph. And before you ask, last year I wore my Dean Winchester bustle outfit for an eight hour shift, and did just fine with it.

More on this crazy scheme, as it develops.

Friday, June 5, 2015

Historical Sew Monthly #5: Practicality

So . . . I fell off the radar for a couple of months. Again.

I actually had challenge number three done in time, but kept putting off photos until it became entirely too late to worry about it. #4 I skipped because I was sick and busy. A few weeks ago I realized I still had time for #5, and got to work. I decided to stick with the bustle era since I already had undergarments, thus saving me quite a lot of effort. After pouring over Pinterest I decided to make something similar to the plaid one on the right:

Or this:
From Museum of London
I picked up a nice red plaid, created a pattern (by laying out my bustle bodice pattern and taping the skirt pattern to it to remove the waist seam) and cut pieces. That's when the thought occurred to me: These look comfortable and practical, like you could get stuff done in them, but with no waist seam they take a lot of fabric. What if this is some high class thing and not the comfy robe I make them out to be?

Luckily, a few google searches later and I realized that they were wrappers, to be worn in the morning for breakfast, and completely acceptable to do housework in. Hussah! The dress came together quickly, and worked well with the trim I got when I bought the fabric. I tried to correct the armsyce using the notes I had jotted down previously, but they still need work. The shoulder point is good, but the front needs to be cut down and the back needs more fabric. I had to piece it to get a better fit, but it still needs to come closer to my arm. Anywhoo . . .

I found one wrapper with a v-neckline, which I copied for my own comfort. There will be frog closures down the front, but I haven't gotten around to that yet.

The wrapper is designed to be worn over my corset and bustle.

There is a pouf in the back to give it some interest, and some trim over the seam for the extra fabric.

My favorite part: pockets! There are two pockets, one on either side of the front. They have matching trim and are deep enough to eat my hands up past the wrist! BTW, close up of the trim:

The swoopy one is cotton eyelet and is on the pockets, neckline, back, and all the way around the skirt about 6 inches up from the hem. The bottom one is a satin polyester pleated ribbon with velvet strip right in the middle. That covers the machine stitched hem on the skirt and the cuffs of the sleeves. All in all I am satisfied with how it turned out. The perfect amount of the fancy and plain to be a proper wrapper.
The Challenge: #5 Practicality 
Fabric: Red plaid cotton quilting fabric
Pattern: The bustle bodice and skirt pattern from my Victorian Femme Supernatural Cosplay
Year: 1884ish
Notions: Cotton thread in red and brown, brown cotton eyelet trim, brown polyester ribbon trim, poly-cotton bias binding, brown cording for frog closures (not shown)
How historically accurate is it? Pretty close. I put too much fabric into the bustle portion, but all of the trim ideas came directly from existent pieces. Say 80% for the polyester content.
Hours to complete: 15ish? I didn't keep track.
First worn:  Right now, for because.
Total cost: $50 or so, but there's quite a bit of fabric and trim left over.