
Saturday, May 24, 2014
Real fast
Not feeling too well, think I might be coming down with a sinus bug that's been going around. It's been affecting my progress, so I might not have much to show at the end of the month. So instead, here is Castiel in her corset:
Also note: Eyebrow.

Thursday, May 22, 2014
Another One Bites The Dust
Third corset completed. Castiel's corset was finished only moments ago, and it feels good to be able to mark something off the list. Next up will be Crowley's chemise and drawers, and hopefully I'll be able to finish Gabriel's corset by the end of the month. Those three things: the chemise, drawers, and corset, are around 50% done at the moment. If I can get them done, then I can mark off the Chemise Step and the Drawers Step entirely, as well as only having one corset left to do. Get that done as far as the final fitting, and I'll be able to start on two more bustles and petticoats. Not to mention starting the actual outfits. We'll see how far I get by the 31st. But now pictures!
 Castiel's corset is a garnet silk, stitched in black silk thread, with black silk binding and champagne lace.
 Close-up on the cording. The silk is a bit darker that the photo shows, it's more of a burgundy than a red.
 Close-up of the flossing. Every other bone is flossed in a feather. For reasons.

The eyelet bones are flossed with a pair of wings. Please ignore wonky stitching on wrong side. Also, this is closer to the true color of the corset. The lacing is champagne to match the trim.
 Finally, a close-up of the lace. You can see some of the feather flossing peeking out.
The hardest part of this corset was that I stitched a couple of boning channels too narrow, and it was a bitch to get the the bones in later. One of the channels even had to be re-stitched. There are a couple of spots on Gabriel's corset that are going to give me the same problem, so I'm going to fix it before I install the spoon busk. No reason to give myself the same headache a second time.
Now I'm off, to go tie up Castiel and see if I can get some shots of her wearing the corset. And for those of you who have watched the season finale of Supernatural:

The eyelet bones are flossed with a pair of wings. Please ignore wonky stitching on wrong side. Also, this is closer to the true color of the corset. The lacing is champagne to match the trim.
The hardest part of this corset was that I stitched a couple of boning channels too narrow, and it was a bitch to get the the bones in later. One of the channels even had to be re-stitched. There are a couple of spots on Gabriel's corset that are going to give me the same problem, so I'm going to fix it before I install the spoon busk. No reason to give myself the same headache a second time.
Now I'm off, to go tie up Castiel and see if I can get some shots of her wearing the corset. And for those of you who have watched the season finale of Supernatural:

Tuesday, May 20, 2014
Suddenly, May
I didn't die on my recent trip or anything, I just haven't really gone online since. I missed the last two HSF challenges, but I got some work done on my 18th century stays. I'm nearly finished with Castiel's corset, just have the second half to floss before pictures. I now have all the supplies to finish the corsets, and Crowley finally was able to visit, so I can start making her things. Her chemise is nearly done, her drawers about 50%, and I fit the mock-up for her corset while she was here. Pretty soon I'll actually be able to cross off whole layers as completed for everyone, which is good since I've started having nightmares about not finishing in time. No pressure, right? Just my subconscious telling me I'm going to fail. :/
Oh, and the Supernatural season finale is tonight (I'll be watching it tomorrow since I don't have TV), so I need to make up some Bailey's for Castiel and I since we'll be watching it together. And Crying. Possibly Screaming.
Oh, and the Supernatural season finale is tonight (I'll be watching it tomorrow since I don't have TV), so I need to make up some Bailey's for Castiel and I since we'll be watching it together. And Crying. Possibly Screaming.
Monday, April 21, 2014
Renaissance Faire!
On Sunday my friends and I went to the Southern California Pleasure Faire and had a blast. There was an Easter parade for the kids, and we spent more time watching shows than we had in previous years. I wore a costume I made up quickly and quietly a few months ago, my Vik-torian costume.
The inspiration with a comment by a friend about trying to mix Viking and Victorian components in a steampunk-ish style. I had trouble with the design at first, until I realized that the bunad, the national costume of Norway, came into being in the 1800s. My mother is Norwegian, and what better why to progress the Viking aesthetic into the Victorian era than by looking at the clothes of the people in Scandinavia. I pulled together ideas like these:
And the resulting outfit:
 The close-up
 The shift/shirt is linen, stitched in the viking style with a keyhole neckline, but with modern cuffs. The neck is bound in store-bought bias tape and some fancy store bought trim circles the neck and cuffs. My tortoise brooches are slotted spoons with the handles broken off, wrapped in wire, with a safety pin on the underside. The double strand of beads are a collection of various bits, the belt was a blank one a stained dark and added a buckle. On the right side you can see my drinking horn (which I totally drank mead out of. Like a Viking.) The apron dress is black wool that I bought on clearance, and the under-bust corset bodice is red wool, with cotton canvas for strength and zip-ties for boning. A different trim goes around the top.
 The lacing eyelets are jewellery clasps I bought, and it is laced with suede cord.
 The the bottom of the apron dress has a different trim, and the bracers are scrap leather with metal grommets for lacing. I painted Viking sigils on them, the left prevents you from getting lost at sea and the right strikes fear in your opponents in battle. I also sewed on some fake fur trim, because a google search of Viking costumes will tell you that you're not a Viking unless you have fur on.
The costume was surprisingly comfortable, I was expecting worse considering I was wearing wool when the temperature was in the mid-80s. But the fabric was thin, the linen helped keep me comfortable, and the fact that I made the outfit knee length meant a had good air flow. I did have to let the corset out a bit, after lunch, but that was easy. I was particularly happy that I got to use my relic bag.
 I knitted it a while ago out of a wool/bamboo blend, based off of this actual Renaissance bag:
So there you have it, Vik-torian costume at the Renaissance Faire. Now to get ready for my trip tomorrow, but one more pic before I go. Here is my cat, Ali, helping me draft of 18th century stays:
The inspiration with a comment by a friend about trying to mix Viking and Victorian components in a steampunk-ish style. I had trouble with the design at first, until I realized that the bunad, the national costume of Norway, came into being in the 1800s. My mother is Norwegian, and what better why to progress the Viking aesthetic into the Victorian era than by looking at the clothes of the people in Scandinavia. I pulled together ideas like these:
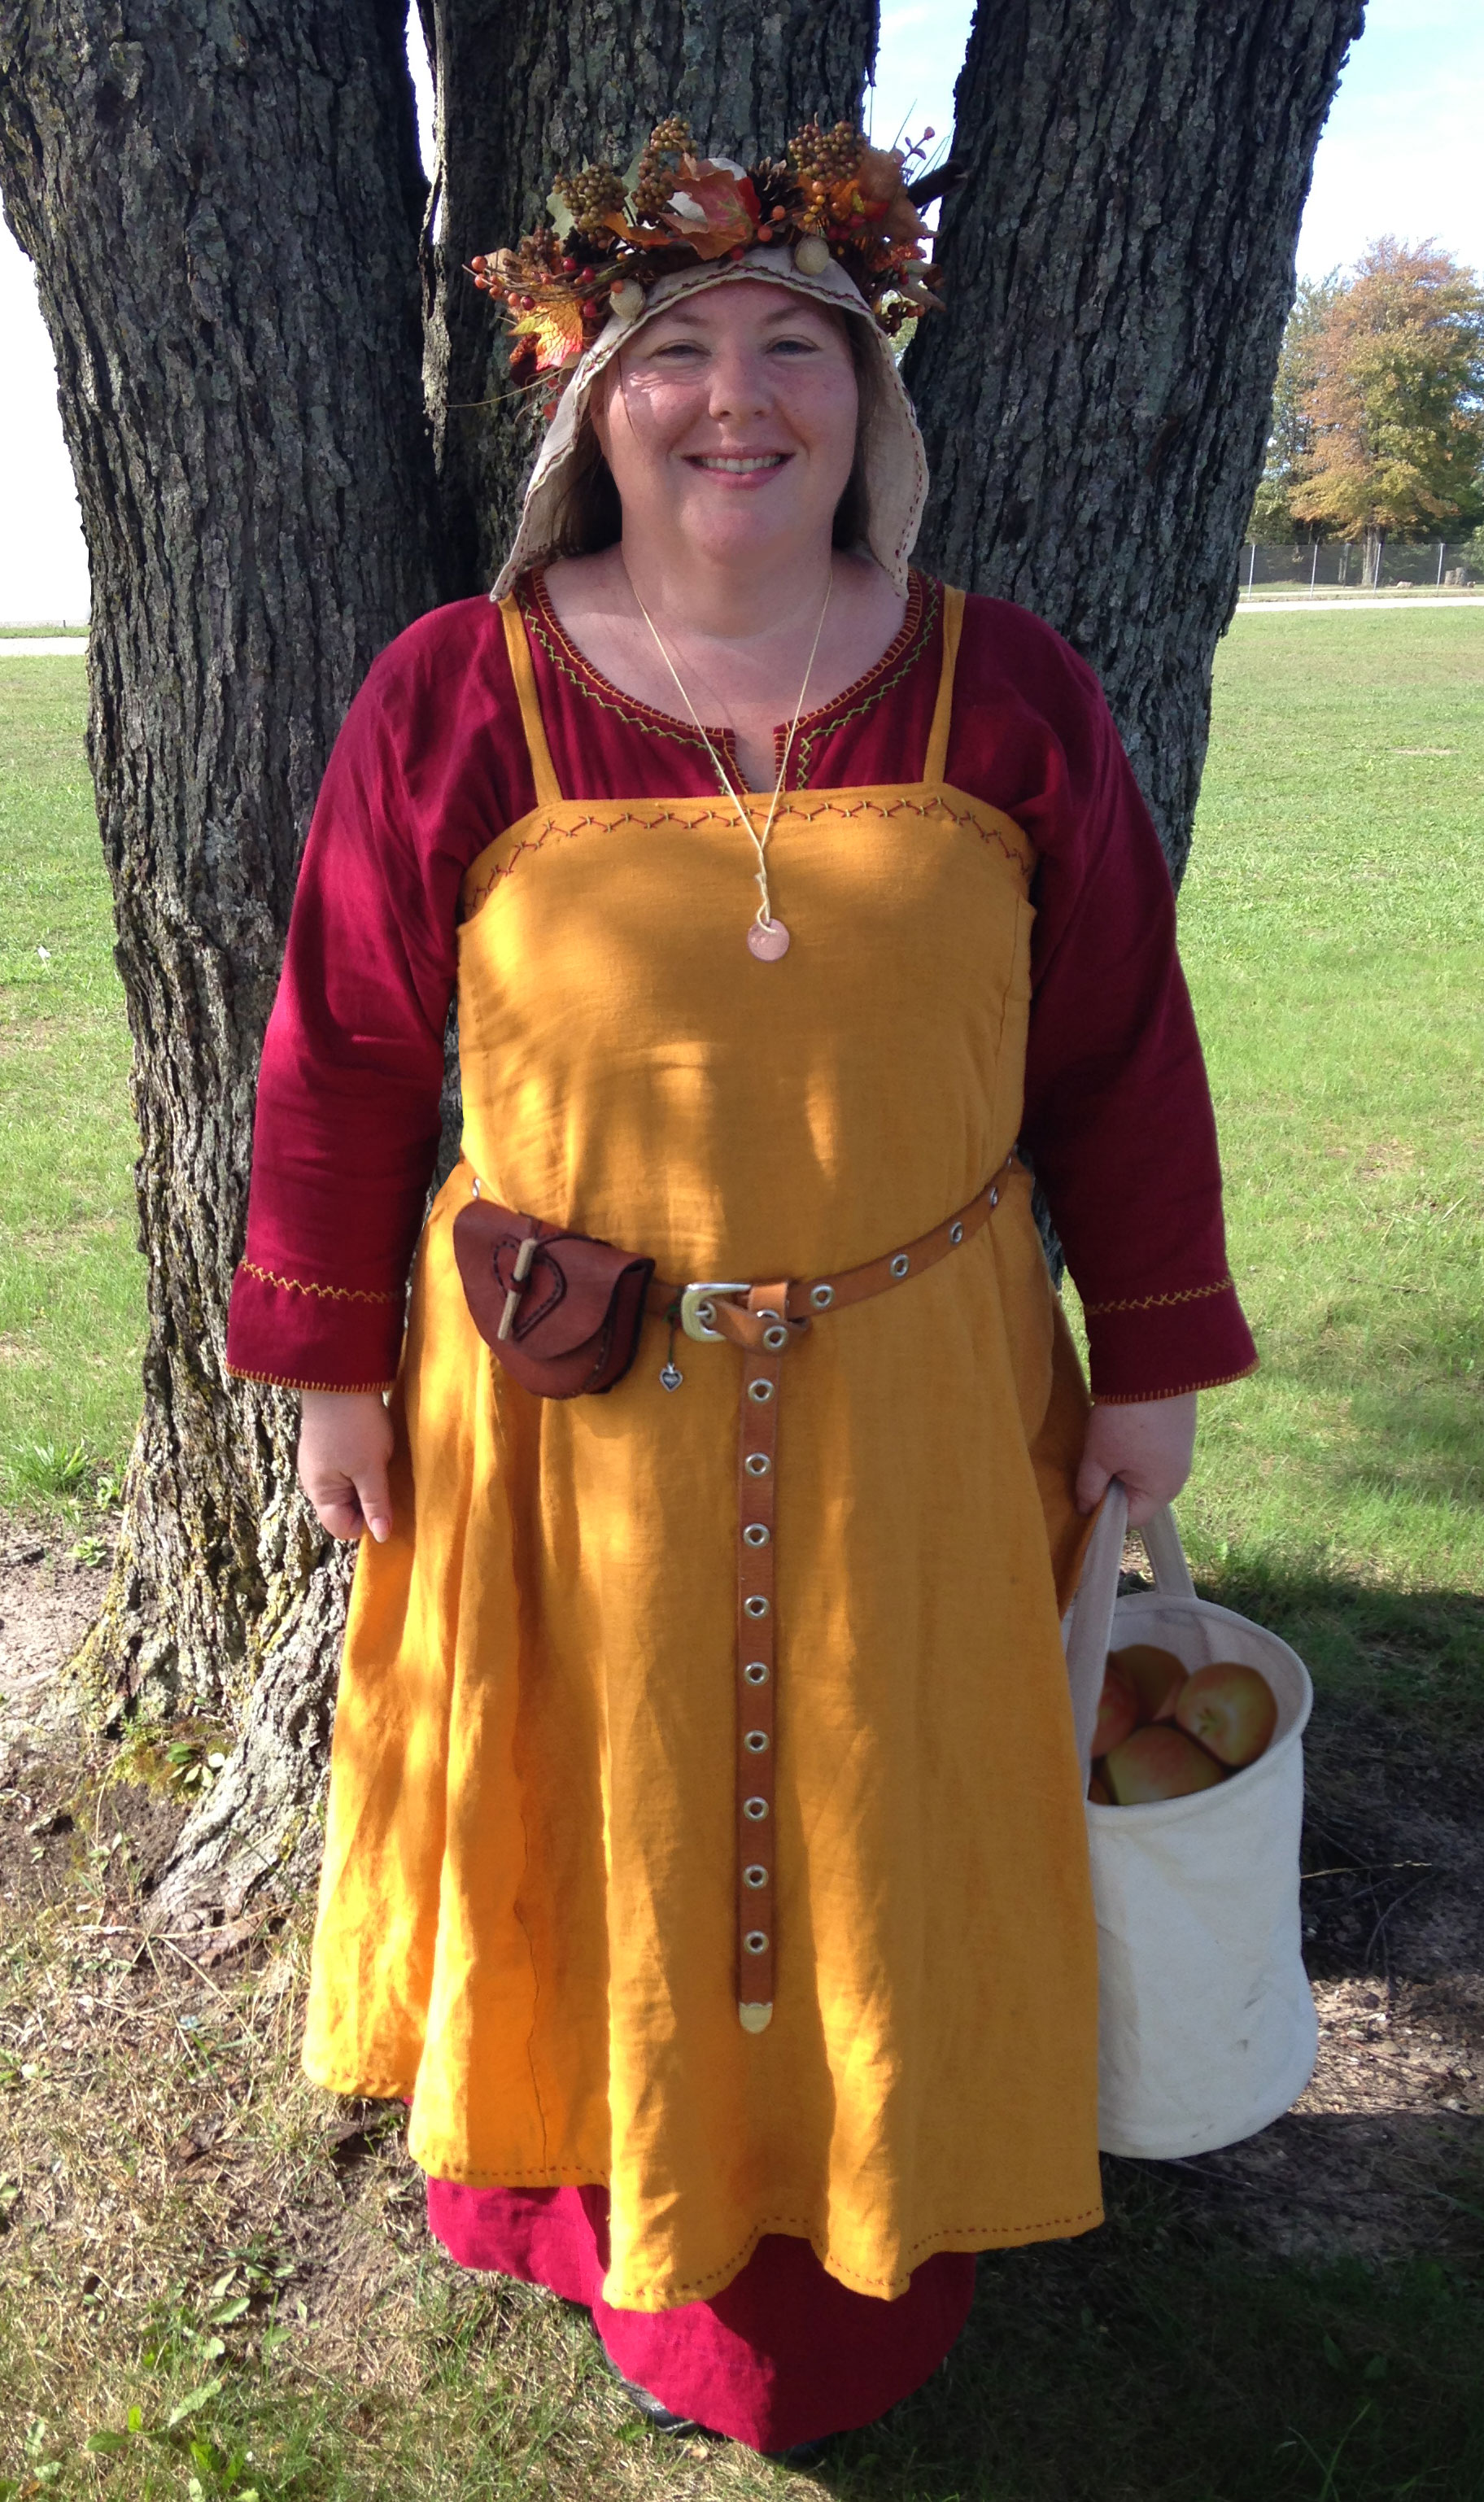 |
| Pattern available here |
 |
| This is similar to the cutting layout I used |
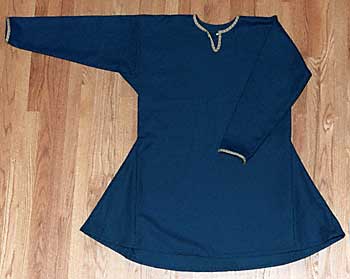 |
| This men's shirt pattern is how I made my shift |
 | |
| The modern inspiration came from this bunad from the Telemark region of Norway |
 |
| I also altered the shirt to reflect the modern bunad blouse |
The costume was surprisingly comfortable, I was expecting worse considering I was wearing wool when the temperature was in the mid-80s. But the fabric was thin, the linen helped keep me comfortable, and the fact that I made the outfit knee length meant a had good air flow. I did have to let the corset out a bit, after lunch, but that was easy. I was particularly happy that I got to use my relic bag.
 |
| My pattern in based off of the description of the Chur Purse. Note: although the gauge for the original is listed as 7 stitches per inch, they mean 7 stitches per centimeter. My bag is 7 stitches per inch. |
 |
| If the internet has taught me anything, it's that every sewing blog should have at least one photo of your cat "helping" you. |
Tuesday, April 15, 2014
Wah-bam!
I am feeling good. Since I will be out of town next week, I wanted to get as much done on my Victorian Femme goals as possible, that way I can hand-sew my shift and stays for the Amazzone costume while I'm on vacation. (I don't want to lug my machine along with me, and I don't like my mother's machine.) Sunday was my day to work on Samifer's bustle, which was completed. Yesterday through Thursday I allotted for Gabriel's corset, and then Friday through Sunday will be Samifer's petticoat, giving me Monday to make a mock-up of the stays and gather the bits so it will be ready to be worked on. Yesterday was spent basting the silk to the coutil on each piece of of the corset. Getting them lined up can be tricky, so I hand sew it, thus it takes a while. Today I started on the actual stitching, and well, look!
 Cording done on all the front pieces, boning channels added to the sides and back, and those pieces stitched together. (While the picture is only of half, I have both sides done to equal completion.) All I need to do is make up some covered channels, add them to the second piece, and stitch it all together. The front channels can't be added until I have the busk, but I should be able to do a final fitting this Saturday. Minus the basting, this thing took a day. A DAY. Mine took over a week. I really feel like I'm hitting my groove. (Beware the groove!)
And one more picture, lest you think Gabriel's corset is a little too similar to Samifer's.
 The color is called 'peacock' and it's a lovely bluish-green. It's stitched with brown silk thread, and following the 'accidentally another fandom' theme (see Samifer's TARDIS corset), it's looking very Daenerys Targaryen.
So I've decided to do dragonscale flossing on it when it's finished. Gabriel fully supports this. Right now I going to take a break for ice cream and beer, and then try to finish this corset.
Update: Aw yeah.

And one more picture, lest you think Gabriel's corset is a little too similar to Samifer's.
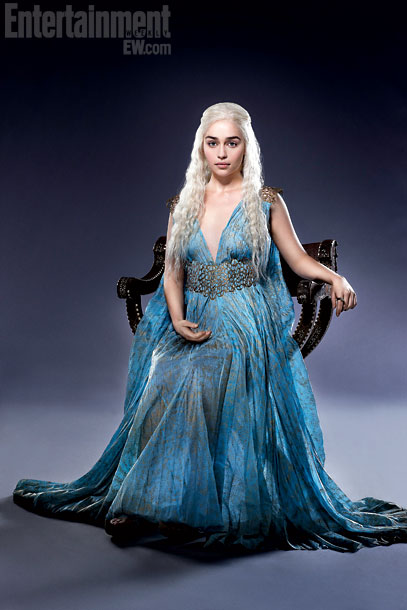 |
| A la this outfit |
Update: Aw yeah.
Sew Historical Fortnightly #7
So I just realized today that these challenges are the Historical Sew Fortnightly, not the Sew Historical Fortnightly. Well, it's in my brain wrong, so it will take a while to correct. Anyhoo.
I had originally planned to knit a pair of socks for this challenge, but I'm having difficulty getting motivated to make the second, so I only have one sock to show. The socks are for Crowley, in a Scotch Plaid pattern. Since Crowley's Scottish, and since my Crowley has notoriously cold feet and could benefit from some thick colorwork stockings, it seemed perfect.
 This is the image from Weldon's Practical Knitter, Twelfth Series. Though I can't find a date for this specific series, the publication started in 1885, and then were reprinted into larger collections in 1888. So the pattern is late 1880s. The original pattern was top down, knit on size 14 needles (Modern size 00, or 1.75mm). They were also intended for a man. Since I was making them for a friend with small, girly feet, I decided to knit the pattern from the toe up, since this made it easier for me to keep the pattern centered. I also used larger needles, size 3 or 3.25mm. These are a bit too large for Victorian stockings, but acceptably small for modern socks.
 I used Cat Bordhi's New Pathways for Sock Knitters Book One to work out a new pattern. I love this book. I use it for all my socks. There's charts where you match your foot size to your gauge and it tells you how many stitches you need for each section of the sock. It's literally a book of how to math socks. Also, I totally spilled tea on it at one point. Here is what I came up with:


It was hard keeping the sock in the light, and my phone didn't want to pick up the colorwork. You can see the Scotch Plaid pattern starts after the single color toe, continues up the leg, and ends at the striped ribbing. The heel is also striped. The breakdown:
The Challenge: Tops and Toes
Fabric: Brown and blue wool yarn
Pattern: Gentleman's Stocking, from Weldon's Practical Knitter, reinterpreted by Cat Bordhi's New Pathways for Sock Knitters
Year: This pattern shows up in the Practical Needlework compilation Vol. 5, and assuming those came out once a year, would put this pattern between 1885 and 1892.
Notions: A set of Size 3 double pointed needles.
How historically accurate is it? The gauge is too loose, and while socks knit from the toe up have been found before this time period it wasn't common in the Victorian era. The colors and yarns are good, though maybe a little thick considering the suggested needle size. I'd say 50% at best, the construction is extremely modern if you know what to look for.
Hours to complete: No clue. I didn't have all the numbers when I started this project, so I was stalled waiting for my friend to measure her feet and text me the numbers.
First worn: Not worn yet. I'm sure once I complete the other one and get them to my friend they'll get regular use.
Total cost: $27, but that was for the two colors. A single ball would have been enough to knit a pair of stockings, so I'll have a lot of yarn left over.
I had originally planned to knit a pair of socks for this challenge, but I'm having difficulty getting motivated to make the second, so I only have one sock to show. The socks are for Crowley, in a Scotch Plaid pattern. Since Crowley's Scottish, and since my Crowley has notoriously cold feet and could benefit from some thick colorwork stockings, it seemed perfect.

It was hard keeping the sock in the light, and my phone didn't want to pick up the colorwork. You can see the Scotch Plaid pattern starts after the single color toe, continues up the leg, and ends at the striped ribbing. The heel is also striped. The breakdown:
The Challenge: Tops and Toes
Fabric: Brown and blue wool yarn
Pattern: Gentleman's Stocking, from Weldon's Practical Knitter, reinterpreted by Cat Bordhi's New Pathways for Sock Knitters
Year: This pattern shows up in the Practical Needlework compilation Vol. 5, and assuming those came out once a year, would put this pattern between 1885 and 1892.
Notions: A set of Size 3 double pointed needles.
How historically accurate is it? The gauge is too loose, and while socks knit from the toe up have been found before this time period it wasn't common in the Victorian era. The colors and yarns are good, though maybe a little thick considering the suggested needle size. I'd say 50% at best, the construction is extremely modern if you know what to look for.
Hours to complete: No clue. I didn't have all the numbers when I started this project, so I was stalled waiting for my friend to measure her feet and text me the numbers.
First worn: Not worn yet. I'm sure once I complete the other one and get them to my friend they'll get regular use.
Total cost: $27, but that was for the two colors. A single ball would have been enough to knit a pair of stockings, so I'll have a lot of yarn left over.
Monday, April 14, 2014
Stupid Adulthood
I had to bribe myself to get things done today. But now that the house has propane again, the car is gassed and had the oil changed, and I have ability to mow the pastures again, I allowed myself a trip to the Dollar Tree to pick up a bottle brush to clean my new drinking horn.
Once it's cleaned and cured, I'll make a leather holster as use it at the upcoming Renn Faire. I was going to coat the interior with beeswax, but considering it can be over 80 degrees F indoors I thought it better not to waste time on something that won't work in the long run. Most guides use ale to cure it, but I wonder if vodka is okay. I like ale, but I have a big thing of vodka gathering dust in the cupboard. And wasting beer always seems like a crime. I plan to do more to it, but there is talk of going to the Renn Faire on Easter, so I doubt I'll have time.
I also picked up a selection of bamboo place-mats to use for boning in my 18th century stays. When I get to work on them (which will probably be during my vacation next week), I'll be using this tutorial, along with information in Norah Waugh's Corsets and Crinolines.
 The pale ones in front have pieces 1cm wide; they're also the longest at 14 inches. They were the most expensive, a whole $2 each at Anna's Linens. Behind it, the next one has white pieces 2mm wide and blue pieces 5mm wide, but only 12 inches long. It was the only one I could find at the Dollar Tree. The two rainbow and two greenish ones at the top of the picture have pieces 3mm wide and 13 inches long. Those were $1 each from Big Lots. I have the width in metric because most articles I've read talk about stay bones in millimeters. 2-4 mm is more period for fully boned stays, but I'm not sure 13 inches will be long enough. But these will be my 'cane' boning for any lightweight stays or corsets I make for a while.
In the upper left corner of the picture are the silk pieces for Gabriel's corset, which I will be basting to the coutil by hand. Luckily, I found The Dark Knight for $5 at Big Lots, so at least I'll have entertainment.
Want to see the Disappearing Pencil trick?
 |
| Is so pretty |
I also picked up a selection of bamboo place-mats to use for boning in my 18th century stays. When I get to work on them (which will probably be during my vacation next week), I'll be using this tutorial, along with information in Norah Waugh's Corsets and Crinolines.
In the upper left corner of the picture are the silk pieces for Gabriel's corset, which I will be basting to the coutil by hand. Luckily, I found The Dark Knight for $5 at Big Lots, so at least I'll have entertainment.
Want to see the Disappearing Pencil trick?
Subscribe to:
Posts (Atom)