Friday, January 30, 2015

Historical Sew Monthly # 1

I took the Foundations challenge to mean underclothes, the foundation upon which the outer garments are built. For my upcoming 1915 outfit, this means a combination and corset.

The combination was pretty simple. I combined the drawers pattern from here and here into something I liked, and then added to the waist a tube 14 inches long and the width of the fabric. A couple of strips make up the shoulder straps, and then eyelet lace was added to the waist and neck to draw it up.
Embroidered lace was added to legs. I also added some iron-on embroidery; not period but oh so nice.
The eyelet lace originally came with white ribbon, but white with white on white was too bland so purple was added. The butt is still too saggy for the period, I think I shouldn't have curved the waist as much; it concentrated too much fabric towards the back. I also could have made the bust area longer, for more blousing with the corset. Speaking of the corset . . .

Last year a friend gave me this fabric:
It a cotton/poly blend, black and white stripe with pink dots interspersed, with a painted-style floral design at the bottom. And it needed to be a corset. However, most corsets concentrate the design along the top, which wouldn't work with this fabric. However, when grabbing stash fabric to make my outer garments, I saw the bolt and realized it would be perfect for a long line corset. I made sure the main floral design would hit along the same spot on the waist, but otherwise didn't try to match the design. The result:
The corset has some black lace along the top, and is edged in store bought blue bias tape.
The inside. You can see the two colors of twill tape I used as boning channels. I ran out of the natural color, and when I went to get more all they had was white.
Here it is on. I love the smooth line it gives. It's super comfy, and since the top edge curves around my bust it gives me a bit of support.
What I don't like is the pooch it gives me. The front busk could have been an inch longer; as it is it ends at the low stomach so there's some squish that sneaks out of the bottom. I'm also going to have to add flossing as the bones have a tendency to shift. However, that ended up being a good thing since the under the armpit bones are a half inch too high and poke me. So I'll just slide them down and secure them in place. I'm undecided about adding garters. I may also add a hook and eye or some grommets to lace the lower stomach closed. I'm going to think about it.

The Breakdown for the Combination

The Challenge: #1 Foundations

Fabric: Cotton lawn

Pattern: Self drafted based on patterns and sales ads from the time

Year: Aiming for 1915, but could have hit anywhere between 1907 and 1919

Notions: White silk thread, eyelet lace, ribbon, embroidered lace, iron on embroidery appliques.

How historically accurate is it? The techniques are good, as is the fabric and the embroidered lace. The eyelet lace is similar to what appears in images, but the iron-ons are right out. I just really liked them. I'm going to say 90%.

Hours to complete: Maybe 6, including pattern drafting

First worn: The moment I finished it because cotton lawn is the most amazing thing I've ever experienced and now I need it for everything.

Total cost: $45. A lot for underwear, but I wanted it to be super nice.


And the Corset

The Challenge: #1 Foundations

Fabric: Coutil and a Cotton/Poly blend

Pattern: Bridges on the Body's 1911 corset pattern

Year: 1911, but it is stated this style can be worn through 1915

Notions: Silk thread, purchased bias tape, cotton twill tape, black lace, busk, bones, grommets, and lacing

How historically accurate is it? Most surviving corsets of this era were buff or natural colored, with the occasional black or brocade. So stripey floral print is unlikely, as is cotton/poly blends. But the construction techniques are solid and based on a surviving garment, so I'm going to go with 80%. If I'd left off the fashion fabric and made my own bias tape it'd be close to perfect.

Hours to complete: From 7pm till 1am on Wednesday, and then noon till 8pm Thursday, with a couple hours break. So in total 12 hours. A fact I am super proud of, considering my very first corset took a solid week of 2 - 6 hour days.

First worn: For the photos on Thursday.

Total cost: $6 for the coutil, fashion fabric was free, thread was $4, $2 for bias tape, $6 for twill tape, $4 for lace, $4 for lacing, $15 for the busk, $10 for boning, $3 for grommets (For the coutil, boning, and grommets, the price reflects buying in quantity and estimating for the portion used)
Total: $54

Thursday, January 29, 2015

I've Been A Bad, Bad Girl

I've been careless with a delicate man . . .

 So last post, I realized that my long line corset needs to be longer. So I redrew the pattern, adding more length both at the waist and at the bottom. And then I . . . did nothing.

I mean, I worked on other projects. Sewing things were happening, just not that corset. I've had time, but whenever I considered working on it, I simply decided to work on something else instead. But I still had the intention to finish it for the Foundations Challenge at the end of the month. Finally today I realized I'd been avoiding it. When I considered why, it dawn on me: I don't want to do another mock-up. I know I should, since lengthening the waist changed the curve of some of the pieces, I should I do another mock-up to make sure it fits okay over the ribcage. But as long as I keep planning to do a mock-up, that corset was going to keep getting put at the bottom of the list.

Corset mock-ups aren't like other mock-ups. You basically have to do 75% percent of the work for a full corset, and then spend a solid 15 minutes lacing yourself into the thing only to go "yeah, that works." And unlike tops or skirts which have 4-6 seams to worry about, corsets have in the ballpark of 10. Mocking-up a corset is a day's work, and I didn't wanna.

So I didn't.

I decided screw it. The pattern was nearly my size anyways, and worst case scenario I'll have the tighten the lacing unevenly. So I cut my coutil and my fashion fabric with an extra inch at the top and bottom just in case, and started sewing. I did check the fit after all the pieces were together, but before I top-stitched the seams, just to make sure I was all good. The extra inch at the bottom was unnecessary, but after curving the top edge around my breasts I kept the rest of the extra.

Now the seams are finished, and once I pick up more cotton twill tape I can finish the last four boning channels. (Yes, I ran out part way through.) Then I just need to install the busk, cut and insert my bones, then add the grommets and binding.

Sometimes it's good to be bad.

Tuesday, January 13, 2015

I need a longer line corset

Did my fitting for my teens era corset and realized something. Bridges on the Body has a much shorter torso than I. She has a pattern for a 1910 - 1914 corset on her website, and since it was the subject of a sew-a-long, all the steps for making it are laid out on the site. So I printed the pattern, scaled it up, and added some extra width to the waist to make it fit (my hip and underbust measurements are the same as the corset's, but my waist is not that tiny). Try it on and wow, the top edge of the corset is a solid 3 inches from my underbust. The back bones need to be shorter than the actual length of the corset so that you don't sit on them, however with me the back edge of the corset didn't even touch the chair. So for my long line corset I need a longer line pattern.

The only real frustration is the fact the genius idea of making the mock-up with one inch seam allowances and trying it on inside out so you can adjust the seams without having to cut new pieces is all for not, since I'm going to have to draft new, longer pieces. Stupid long torso.

Saturday, January 10, 2015

A New Year . . .

. . . A new line of challenges.

My failed attempt to make the Mary of Hapsburg hemd in time for the last Historical Sew Fortnightly challenge was partly due to the fact it needed full concentration and thus couldn't be combined with Netflix, and partly because I came up with a couple of awesome present ideas so they took priority. I still have presents to finish, but here are my current plans for 2015.

1915 outfit. There's a centennial celebration in San Diego in April, which will be enough time to put together a lovely outfit. I almost have the combination done.

Steampunk Wood Elf, for no particular reason. I just got the urge one day.

Gambeson, for my friend. It is more or less assembled, but I still need to quilt the bastard.

Mary of Hapsburg hemd, since I didn't get it done last year.

Costumes for Pasadena Con. This year I'm going easier, possibly 1950s. There will also be a skit to go with the outfits instead of just straight costumes.

18th Century stays. I started on a 1780s pair, but I may switch to 1740s for no reason *cough* Outlander *cough*.

No other plans at the moment, but I'm sure other things will get tacked on as time goes by.

Tuesday, December 16, 2014

Historical Sew Fortnightly #23

So I actually had this challenge completed almost two weeks ago, but I was lazy about taking pictures and writing this post. I knew months ago what I wanted to make for this challenge, and was happy to actually be able to accomplish it. Although most probably wouldn't consider it to be modern wear, I really wanted a short sleeved Viking linen gown to wear as a summer dress. I love the comfort of loosely fitted gowns, and I wanted something long and linen and perfect for the day to day. Here is what I made:
The full gown, still wrinkled from the last time I wore it.
Close up of the embroidery. I intend to do similar embroidery on the sleeves.
Close up of the neckline.
The gown being worn. This is also the best representation of the color.
The gown is a long rectangle, the width of half my bust plus some ease, and folded at the shoulder. It is gored from the low waist down to the hem, adding an extra 26 inches per gore. One gore was pieced to conserve fabric. The sleeves are rectangles, and there are underarm gussets. All seams were flat-felled.

The hem facing, sleeve and neckline detail are mustard colored wool, with the visible edges whipped down with cotton thread over wool yarn as filler thread. The embroidery is chain stitch.

I have worn this dress repeatedly, and I love it. I plan to make a leather vest or waist cincher to wear over it to make it more fitted and more modern looking.

The Breakdown:
The Challenge: #23 Modern History

Fabric: Green linen-blend, yellow wool-blend

Pattern: None, made it myself

Year: 9-13th century

Notions: Cotton thread, cotton embroidery floss, wool yarn

How historically accurate is it? The pattern is good. However both the linen and the wool were blended with rayon, and all of the seams were machine stitched. And besides the underarm gussets, all the flat-felled seams were also machine stitched. The embroidery is my own pattern, so unknown accuracy, but the chain stitch was used. This is probably my worst, say 20%.

Hours to complete: 5 for the dress, 15 for the embroidery

First worn: The day it was finished, to go out to dinner with my husband

Total cost: The wool was a remnant, the embroidery floss was inherited, and the yarn was clearance. All told, I think it was $25-30.

Wednesday, December 3, 2014

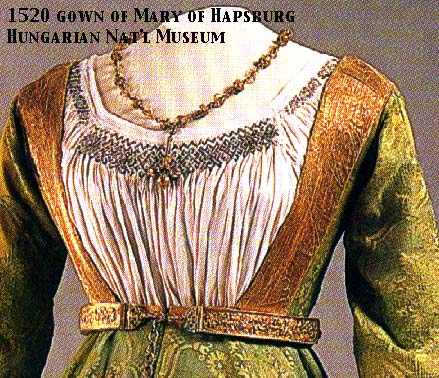
Mary of Hapsburg Hemd

So a while ago I came across an image somewhere (I want to say Pinterest, but I don't remember for certain.)
Website with details and other images here
In fact, I'm not entirely certain that this was the view that set me off, all I remember is clicking through and knowing, KNOWING, 'I have to make that!'

But I was in the middle of other projects and thus it remained as a note in the back of my brain. But now? Now I am determined to start it. I had already picked up some thin linen and metallic embroidery thread for the hemd or chemise, so last night I cut the pieces, and today assembly started. The pieces are big. The front and back pieces are 71 inches, and the sleeves are 48 inches. And all of that gets pleated down to the neckline. I thought I was prepared for the amount of work that entailed, but I forgot something. That 6+ yards of fabric needs to be hemmed first, before the smocking can begin. Did I mention I want this outfit to be accurate, and thus handstitched?

What have I got myself into?

Monday, December 1, 2014

Historical Sew Fortnightly #22

After my massive, nearly a year long project was finished (and which I still owe photos), I figured I'd take a break from sewing. Step away from the machine, do other things for a while, and probably let the rest of the challenges slide. I didn't even have an idea for the Gentlemen challenge, so a break would be had. Except, I made that Regency turban. And the burgundy linen was fantastic to work with. And a matching spencer would fit the challenge and be awesome. So within a few days of getting back from BurCon, I was onto my next project.

I didn't have a pattern, but I soon realized that modifying my bustle era bodice would be a lot easier than trying to adapt a modern coat pattern since my bustle bodice already fit and had the curved back seams that were popular from the 1700s through to 1900s. (Possibly earlier, but I haven't really looked at the 1600s.) I extended the front shoulder pieces by two inches, and subtracted them from the back. I cropped it short and added two inches to the hem circumference so it wouldn't be overly tight. I followed Sensibility's instructions for constructing a spencer, but used Tea in a Teacup's idea of interlining it with cotton flannel. (She also gave me the inspiration of adding awesome shoulder thingys.)

The jacket is burgundy linen blend, interlined with cotton flannel and lined with thin muslin.
Close up of shoulder cap, which has brown piping at the shoulder seam and yellow trim along the edge.
Spencer closes with hook and eyes. Front edge is piped in upholstery trim and left over yellow trim from my turban. Buttons are textured metal, and the bottom edge has the burgundy tassel fringe that I tried to use on my turban.
The side back seams are piped in brown, and a tab is piped with the trim from the front edge and sewn down with buttons.
The spencer while worn. The shoulder caps flare out slightly. The sleeves have tabs on them, trimmed in the last of the yellow soutache from the turban and sewn down with buttons. The sleeves are extra long and reach my knuckles, and are finished with brown piping.
The back. I should have added a half inch to the back armscye, as it has a tendency to pull. The back tab pulls in the waist slightly, and the extra fabric is stitched down in pleats to prevent shifting.
With matching turban

  
I am super proud of this jacket. This is the first time when making my own pattern that I felt like I did everything in the right order. Normally I'll realize I should have done something earlier and have to finagle it to get it to work. The trims went down in the right order, the jacket fits wonderfully, and all the little details really pull it together. I even did a fish eye dart at the elbow of the sleeves, AND clipped the flannel close to the stitching so it isn't bulky. I've taken to wearing this spencer on a regular basis, and have plans for it. I've added buttons to the interior, and plan to pick up more linen, interline it and trim it, and attach it to a band that can be buttoned to the inside for an instant pelisse. I'm also going to make a matching petticoat to combine with the spencer for a period riding habit.

   I apologize for weird formatting, Blogger is being an asshole.
The Challenge: #22 Gentlemen

Fabric: Burgundy linen blend, red and brown cotton flannel remnants, muslin remnant

Pattern: Self made, adapted from my bustle era bodice

Year: 1800-1810. I picked and chose bits from styles I liked for a generally earlier Regency silhouette.

Notions: Cotton thread, metal buttons, polyblend piping, hooks and eyes, four kinds of yellow polyester trim and a burgundy polyester trim.

How historically accurate is it? The style and cut is good. The outer fabric should be pure linen, as should the thread, and I'm not sure how accurate cotton flannel interlining is. All of the trims are polyester, and it was machine stitched. Let's say 40%.

Hours to complete: 20 - 30.

First worn: About a week ago, to the grocery store to get ice cream. Not yet worn as part of a historical costume.

Total cost: The fabric was $11, the interlining was two remnants, total of about $5, the lining was $3. Most of the buttons were bought on clearance, though I did pay full price for one pack, total $5. Trims cost the most, but I think in total the spencer cost me around $40.